
Terrazzo Hallway Floor Renovation in Cardiff for the Archbishop of Wales
After undertaking restoration work for Catholic churches in the areas of Wales and England over the past years, I was recommended to the team who maintain the personal residence of the Archbishop of Wales in Cardiff. They had decided to restore the Terrazzo flooring at the property and I was invited over to quote for doing the work.
The flooring had seen many years of wear and tear due to the nature of the building and the amount of footfall relating to meetings and staff. They were delighted to have found us and I was more than happy to get involved and be able to reassure them that I was confident the floor could indeed be restored to its former glory.
 |
 |
I attended a meeting at the property with the church architect to discuss the work needed and talk about the history of the property. It turns out the floor had been covered in carpet and this had been giving people at the property an allergic reaction due to dust accumulating in its thick pile. After removal of the carpet, they discovered the original Terrazzo floor underneath and decided it would be best to have that renovated.
The Terrazzo suffered from numerous issues including adhesive staining and the imprinted pattern of the carpet underlay, fortunately however there were no cracks which can be an issue with Terrazzo floors of this age. Having surveyed the floor I explained the method of work needed to the architect, and we then agreed the price and arranged to carry out the work on a time schedule that suited.

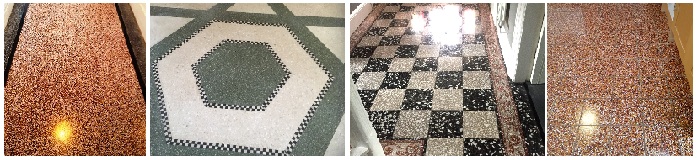
Cleaning and Repairing a Terrazzo Tiled Hallway Floor
To start the restoration process, I began by scraping as much of the remaining adhesive and other contaminates off the surface of the floor with a handheld scraper attached with a 6-inch razor blade. Then I was able to run over the Terrazzo with a coarse 50-Grit diamond pad fitted to a rotary floor machine, this was followed by a 100-grit then 200-Grit pad to remove more ingrained residues. Water is used to lubricate this process and the slurry generated is rinsed off after the application of each pad and extracted with a wet vacuum.
The next stage was to polish the Terrazzo using a set of less aggressive burnishing pads, starting with a Tile Doctor 400-grit pad then a 800, 1500 pad again using water to lubricate the process, rinsing with water between pads and vacuuming the waste as I worked.
Sealing a Victorian Tiled Hallway Floor
The Terrazzo was left to dry out overnight and the following morning the floor was tested for moisture with a damp meter. I do this to avoid applying sealer to a damp floor which can lead to an uneven finish. In this case the readings were fine so I was able to move on to apply the sealer.
The sealer used was Tile Doctor Colour Grow which contains a colour enhancing ingredient that lifts the colours in the stone whilst providing a durable hard wearing sealed finish. Additionally, this product is fully breathable which is an important consideration when sealing old floors like this that won’t have a damp proof membrane.
 |
 |
Once completed the entrance hall looked a lot more welcoming for visitors, more importantly the Archbishop and the Architect were delighted with the result as they were initially unsure if it could be restored.

For aftercare cleaning going forward I recommended the use of Tile Doctor Neutral Tile Cleaner which is a mild but effective pH neutral cleaner that is safe to use on sealed floors and has a nice fresh smell.
Professional Restoration of a Terrazzo Tiled Hallway in South Wales
Terrazzo Hallway Floor Renovation in Cardiff for the Archbishop of Wales Read More »