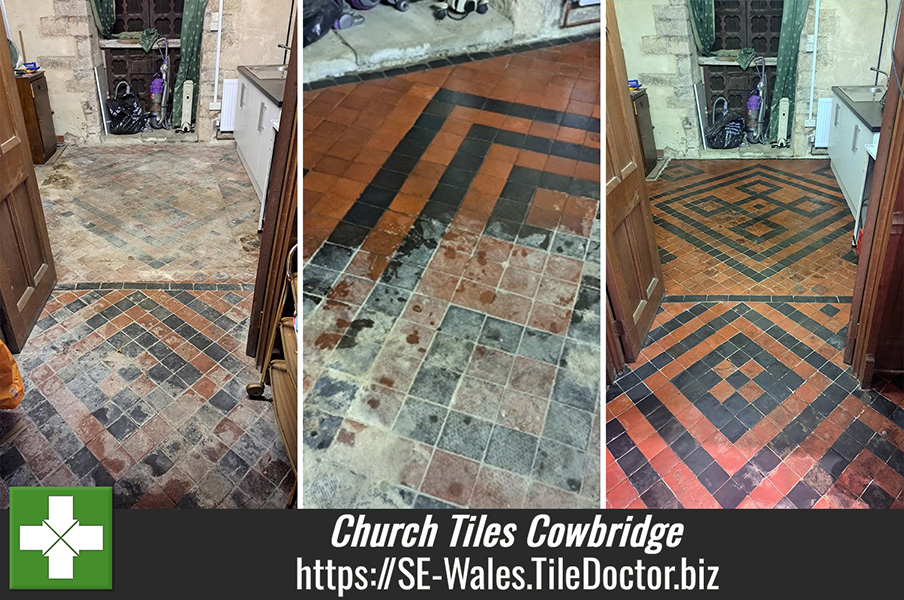
Cowbridge Tile Cleaning

Cowbridge Tile Cleaning

Welcome to my Work History archive where you will find examples of the cleaning and renovation of tiles carried out in Cowbridge.

Stone Bathroom Tiling Renovation Cowbridge

Restoring the Appearance of Bleach Damaged Stone Tiling in Cowbridge

Last year we were approached by a customer in the market town of Cowbridge looking for a professional bathroom restorer to renovate their stone tiled bathroom. Apparently, their cleaner had etched the tiles using neat bleach unaware of the damage a strong product like that could have on natural stone.

Stone Bathroom Tiling Before Cleaning Cowbridge

I arranged to call in on the customer the next time I was in the area to discuss the work and take a close look at the tiling. Three different types of stone had been used in the bathroom with Limestone wall tiles in the shower, Black Marble mosaics formed the shower tray and bath panelling, and the floor had been laid with Black Slate.

Having discussed the bathroom at length with the customer it was clear that their main concerns were that the stone had lost its shine, the grout had discoloured, and a lot of the silicone was stained and needed replacing. I worked out a comprehensive plan to revive the bathroom and created a detailed quotation to do the work that listed all the necessary work. My customer was happy with the quote, and I got the go ahead to book the work in.

Black Marble Mosaic and Limestone Shower Tiling Before Cleaning Cowbridge Black Slate Bathroom Floor Tiling Before Cleaning Cowbridge

Renovating a Stone Bathroom Tiles

Before starting the cleaning, I spent some time protecting the fragile surfaces that didn’t need attention with protective sheeting.

Stone Bathroom Tiling Before Cleaning Cowbridge

Next the shower Tile and grout was scrubbed with a strong dilution of Tile Doctor Pro-Clean and a Black pad that I had cut down so it could be used by hand. The shower walls were then rinsed with water using the shower head which is one of the convenient advantages of working in a shower.

Focus then shifted to the Black Mosaic tiles on the floor of the shower using more Pro-Clean this time mixed with Nanotech HBU for extra cleaning power. This was scrubbed into the grout joints with a brush and a Black pad for the tile surface. I used the same process on the Marble mosaic bath panel. Once done the tiles were rinsed with water.

The next step was to cut out the silicone sealant around the permitter of the shower tiling and spray the area with Tile Doctor Duo Clean which kills mould. Once dry the silicone was replaced with a new anti-mould silicone.

Black Marble Mosaic and Limestone Shower Tiling After Renovation Cowbridge

The shower enclosure tiles were then sealed with Tile Doctor Pro-Seal a durable sealer that doesn’t alter the appearance of the stone. The customer liked the light appearance of the Limestone and wanted to keep it that way.

Limestone Shower Wall Tiling After Renovation Cowbridge

Refreshing Black Slate Bathroom Flooring

The last area to focus on were the Black Slate tiles on the bathroom floor which were also in a similar worn condition. The old sealer had clearly broken down on these and was now letting dirt become ingrained in the stone reducing the vibrant appearance of the Black Slate. I tread this by removing what was left of the original sealer with an application of Remove and Go mixed with Nanotech HBU and Pro-Clean. I left this cleaning cocktail to dwell for about half an hour before scrubbing with a coarse black pad and scrubbing brush.

The floor was then rinsed with water to remove the soiling and now looked much improved. Once dry it was sealed with Tile Doctor Colour Grow which is an impregnating sealer that contains a colour enhancer and provides a durable finish especially in bathrooms. This worked out very well on the Slate helped to add depth to the stone as well as bringing out more of the features in the stone.

Black Slate Bathroom Floor Tiling After Renovation Cowbridge

The customers were delighted with the result and I’m please to say the service, in fact they have since recommended Tile Doctor to their friends, colleagues and family.


Marble Tiled Shower Cubicle Professionally Refinished in South Wales

Restoring the Appearance of Bleach Damaged Stone Tiling in Cowbridge Read More »

Dirty Terrazzo Floor Deep Cleaned, Burnished and Sealed in Bridgend

Dirty Terrazzo Floor Deep Cleaned, Burnished and Sealed in Bridgend

Terrazzo is a quite a bit different from the natural stone floors we most commonly work with. It’s a type of flooring material that was made popular by Venetian builders in Italy in the 1920s, but is ultimately descended from styles of design that date back hundreds of years. A typical Terrazzo floor consists of chips of marble or granite set in concrete and polished to result in a smooth surface.

This Terrazzo floor, installed in the hallway of a property in Bridgend, South Wales, was in relatively good physical condition, but it had clearly lost its shine due to the build-up of dirt and muck over the years. In fact, it was first installed in around 1940! The owner was keen to have it rejuvenated to its best possible condition, so they asked me to come in to see what I could do.

Old terrazzo hallway floor before polishing Bridgend Old terrazzo hallway floor before polishing Bridgend

Cleaning and Burnishing a Dirty Terrazzo Tiled Floor

My first course of action was to apply Tile Doctor Pro Clean liberally across the floor and leave it to dwell for a short period. This is a high alkaline cleaner that is designed to deal with light to moderate soil build-up, and to strip away any old sealer remaining on the floor. I scrubbed the product in using a black pad fitted to a rotary machine and vacuumed up the resulting cleaning with a wet-vac machine.

Next, to restore the shine to the floor, I undertook a process known as burnishing, which involves the application of diamond encrusted polishing pads. We will typically start with a Coarse grit pad to level off any uneven areas of the floor and grind down any particularly stubborn marks and stains. Then, we gradually refine the polish on the floor using Medium and Fine grit pads. A small amount of water is used as lubrication with each pad.

After I had finished applying the first three pads in our four-pad system, I gave the floor a thorough rinse and left it to dry overnight.

Old terrazzo hallway floor during polishing Bridgend

Sealing a Terrazzo Tiled Floor

I returned to the property the next day and immediately ran some damp tests to check for excess moisture issues, which one might expect with an old floor like this one. Thankfully, the floor proved dry – and I could finish the burnishing process with the fourth and final Very Fine diamond encrusted burnishing pad, which achieved a beautiful shine finish.

Finally, I sealed the floor with three coats of Tile Doctor Colour Grow, an impregnating sealer which provides robust protection and enhances the coloured patterns in the Terrazzo.

Old terrazzo hallway floor after polishing Bridgend Old terrazzo hallway floor after polishing Bridgend

As you can see from the photos above, the floor is looking so much more colourful and bright after a deep clean, polish and a fresh seal. The customer was over the moon!

Professional Restoration of a Dirty Terrazzo Tiled Floor in Bridgend

Dirty Terrazzo Floor Deep Cleaned, Burnished and Sealed in Bridgend Read More »

Heavily Worn Polished Limestone Floor Restored in Cowbridge

Heavily Worn Polished Limestone Floor Restored in Cowbridge

When given the right care, a polished Limestone floor can be an amazing asset to any house. If neglected, however, the tiles can quickly discolour from wear, especially in areas of high traffic, such as the kitchen.

Such was the case at this house in the small, picturesque town of Cowbridge, in South East Wales. My client had contacted Tile Doctor to see what could be done to improve the condition of the tile and grout which, as you can see from the photographs had not been properly maintained.

To get the floor back to its best it would need to be burnished which is a process that rejuvenating the appearance of polished stone through the application of different grades of diamond encrusted floor pads from coarse to very fine.

Re-Polishing Limestone Floor Tiles

Before beginning the burnishing process, I made sure to check that there were no inherent moisture issues using a damp meter, the home owner had informed me beforehand that the floor did have a damp proof membrane installed however it is always a good precaution to check and additionally it provides a good baseline for later when checking the floor has dried after cleaning.

Polished Limestone Before Burnishing Cowbridge Polished Limestone Before Burnishing Cowbridge

Burnishing and Sealing a Limestone Tiled Floor

The Tile Doctor burnishing system consists of four main burnishing pads. I began by applying the coarse pad to the tiles lubricated with a little water, before rinsing the floor and moving on to medium and fine grit pads again lubricating with water and rinsing after each pad. After finishing with the third pad, I paused to rinse the entire area a thorough rinse extracting the resulting waste with a wet-vac machine.

Polished Limestone During Burnishing Cowbridge
I then paid special attention to cleaning the grout lines, which had turned black in places. I applied undiluted Tile Doctor Pro Clean and agitated the grout lines with a stiff scrubbing brush to restore the original colour. This was followed by another thorough rinse.

Polished Limestone Cleaned Grout Cowbridge

Sealing Limestone Floor Tiles

I left the floor to dry overnight, before completing the burnishing process by applying the final very fine grit pad which adds that aesthetically pleasing shine. I used the damp meter to check the floor had dried and once I was happy I began the sealing process with the application of three coats of Tile Doctor Colour Grow. Colour Grow is a great choice for Limestone as it penetrates into the pores of the stone protecting it from within whilst enhancing the natural colours in the Limestone. As a final step and to ensure there were no unappealing marks left on the floor, I went back over the floor once more with the fine grit burnishing pad.

Polished Limestone After Burnishing Cowbridge
What was once a dull stone floor with dirty grout lines has now been restored back to its original condition and with the correct maintenance going forward should stay that way for some time.

Cleaning, Burnishing and Sealing a Polished Limestone Floor in South Wales

Heavily Worn Polished Limestone Floor Restored in Cowbridge Read More »

Damaged Victorian Tiled Hallway Refurbished in Port Talbot

Damaged Victorian Tiled Hallway Refurbished in Port Talbot

A customer in Port Talbot discovered an original but damaged Victorian Tiled Floor, circa 1890, hidden under laminate flooring in their hallway and were keen to restore it back to its original condition. They trawled the Internet and discovered Tile Doctor, made contact and a visit was arranged to conduct a survey.

The Victorian floor tiles were in a poor condition and to make matters worse a central heating pipe had been laid through the width of the hallway floor destroying the Victorian tiles. I assured the owners something could be done and we made a booking for me to return and do the work; in the meantime I spent a considerable amount of time sourcing tiles with the right measurements to replicate the original. Fortunately I managed to find a close match with a tile supplier called Original Style.

Victorian Tiled Floor Renovation Port Talbot Before Victorian Tiled Floor Renovation Port Talbot Before

Restoring Victorian Floor Tiles

My first task was as always to check for moisture then to scrape as much adhesive and paint off the tiles as possible; then resorting to a chisel and small jackhammer tool around all the edges of the area to be replaced to remove any more badly damaged tiles.

Victorian Tiled Floor Renovation Port Talbot During Victorian Tiled Floor Renovation Port Talbot During

I could see from the start I was going to need all the assistance I could get to clean this floor and lifts the stains out so to deep clean the tiles I applied Tile Doctor Remove and Go mixed 50/50 with NanoTech UltraClean which adds fine abrasive particles to an already powerful coatings remover. I brushed the solution over the whole floor and then went over it with a rotary machine fitted with a black scrubbing pad. I then left it to soak in for at least an hour before going over it again with the machine. Next the floor was rinsed with water to remove the worst of the dirt and to enable further attention to be focused on the more stubborn stains. Further cleaning was required so I covered the tiles in Tile Doctor Pro Clean which is a strong alkaline cleaning product and then rinsed the floor again scrapping off any old paint and stubborn glue residue in the process.

The floor was looking much improved but there were still areas with light cement smears and deeply ingrained dirt so this time I applied Tile Doctor Grout Clean-up which is an acid based product so you can’t leave it on too long but it’s the only effective way to treat mineral type deposits. I wanted to be sure all this product was removed so afterwards the floor was rinsed three times using a wet vacuum to remove the water. Once I was satisfied the floor was clean I applied a levelling compound to the area damaged by the heating pipes for the new base so I could tile it the following day.

Victorian Tiled Floor Renovation Port Talbot Before Victorian Tiled Floor Renovation Port Talbot During

Repairing a Victorian Tiled Floor

On the second day I started by cutting larger tiles into small pieces as the tiles were only certain sizes available from the tile supplier, but the colour match was nearly perfect so I made do. Next I started to tile the area using a fast setting adhesive so I could grout the tiles the same day. Once everything had set I gave the rest of the floor a final steam clean to make sure there was no trace of chemical that could upset a sealer.

Victorian Tiled Floor Renovation Port Talbot Before Victorian Tiled Floor Renovation Port Talbot During

Sealing a Victorian Floor Sealing

I left the floor to dry out over the weekend and then came back on the Monday to seal the tiles with Tile Doctor Seal and Go which is ideal for this type of tile as it adds a nice shine. I applied three coats leaving and interval in-between so it could dry before applying the next coat.

The customer was delighted with the results and that she chose Tile Doctor to do the work, we were not the cheapest quote she had received but you have to admit the floor looks like new so well worth the money.

Victorian Tiled Floor Renovation Port Talbot After Victorian Tiled Floor Renovation Port Talbot After


Victorian Tiled floor restored in South Wales

Damaged Victorian Tiled Hallway Refurbished in Port Talbot Read More »

=================================

South East Wales Tile Doctor

================================= Read More »

Scroll to Top