hallway

Victorian Tiled Hallway in Cardiff Before and After Restoration

Original Victorian Tiled Hallway Thought Beyond Repair Rejuvenated in Cardiff

Many property owners who are lucky enough to have an original Victorian tiled floor in their homes face the same conundrum: can an old and potentially very damaged floor be salvaged and restored to peak condition or should I replace it?

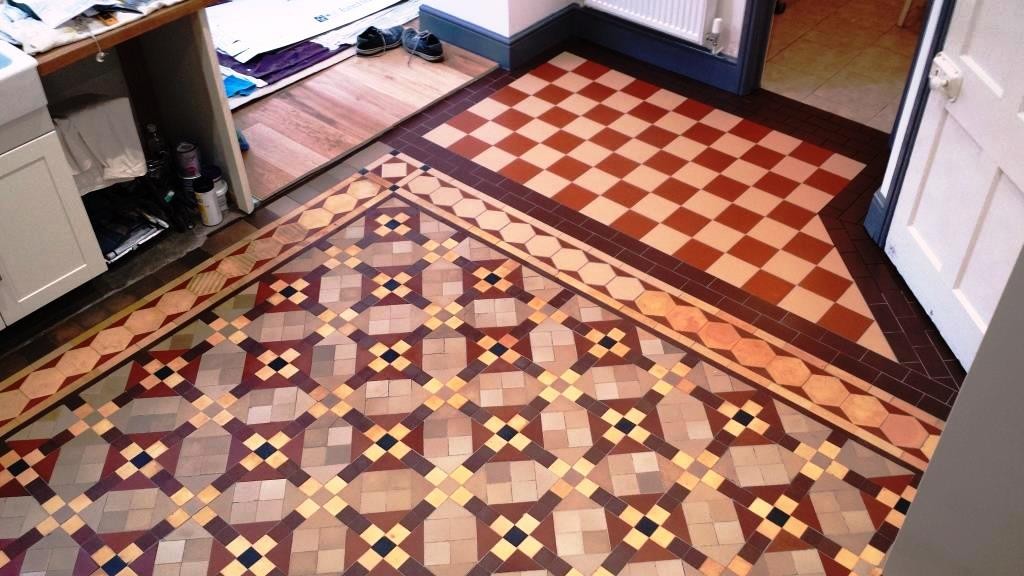
Some people would instinctively tell you that the answer is no – even trained professionals! In fact, a leading tile restoration company (which shall remain unnamed) based in Cardiff told a recent customer of mine that her original Victorian tiled floor, dating back to 1905, was beyond repair. The company recommended that she not waste any money on having it restored and instead that she should have it ripped up and replaced.

Victorian Tiled Hallway in Cardiff Before Restoration
It was in a bad state, however replacing the floor would incur a significant cost and the original characteristics of the period floor would be lost. The customer was feeling rather deflated and was left undecided on what to do. Fortunately after browsing the web for a solution, she came across Tile Doctor and I was asked to pop over and take a look.

I visited the customer at her home and removed parts of her hallway carpet to get a better look at the Victorian tiles beneath. The floor was certainly in a very poor state, there were many old paint splash marks covering the tiles and the surface of the floor was deeply darkened after many years’ worth of wear and tear. In my opinion however, it was still salvageable, and the customer was happy to see what could be done.

Cleaning an Original Victorian Tiled Floor

A week before I was due to start the restoration, I asked the customer to remove the foam-backed carpet to let the floor breathe a bit.

Before beginning the work, I ran a few damp tests and the floor proved surprisingly dry considering how old it is and the very probable lack of a damp proof membrane. I started by manually scraping as much of the old paint staining off the stone as possible and cleared other debris from the surface.

Knowing that clay based Victorian tiles like these easily soak up paint splashes, I knew it would take a thorough clean to remove them completely. I firstly soaked the floor with water and left it to dry slightly before mixing a concoction of Tile Doctor NanoTech HBU, Tile Doctor Pro-Clean, and Tile Doctor Remove and Go.

NanoTech HBU is a particularly powerful cleaner which uses nano-sized particles to penetrate the pores of the stone, while Pro-Clean is an alkaline-based cleaner that tackles heavy soil build-up. Remove and Go is a multi-purpose product which both cleans and strips away any old sealer.

I left this mixture to dwell on the floor for around half an hour, scrubbed it in firstly using a black scrubbing pad fitted to a rotary machine and then a wire wool pad. I followed by rinsing the products off with water and extracted up the excess with a wet vacuum machine.

This technique was repeated until I was satisfied with the condition of the floor.

Sealing an Original Victorian Tiled Floor

After leaving the floor to dry off completely overnight, I returned to the property the next day to carry out the sealing process. I applied seven coats of Tile Doctor Seal and Go, which not only adds a protective covering to the tile, but also enhances its appearance.

The customer was absolutely thrilled with the results of the restoration, especially considering that she was told the floor was ruined by a leading company and not worth saving.

Victorian Tiled Hallway in Cardiff After Restoration
I think you will agree that its always worth trying to restore a period floor and my customer deserves praise for sticking to their guns.

Professional Period Victorian Hallway Floor Restoration in South Wales

Original Victorian Tiled Hallway Thought Beyond Repair Rejuvenated in Cardiff Read More »

Victorian Hallway Floor Blackwood Before and After Restoration

100+ Year Old Victorian Tiled Hallway Restored to New in Blackwood

This Victorian tiled hallway floor, located in a property in Blackwood, South Wales, was in a bad way. It was suffering from several broken and missing tiles, and the entire floor looked like it had not experienced a good clean and fresh seal in several years. The property itself dated back to 1905, and it’s very likely that the Victorian tiles are original.

However, the property owner was very hopeful that the hallway could be rejuvenated, so he contacted me to carry out the work. Upon my first inspection of the floor, I could immediately see that a lot of tile replacements would need to be carried out.

I suggested to the customer that I repurpose the tiles that surrounded the matt well at the front of the door to use as replacements for the tiles that were broken and damaged. I would then create a new, larger matt well while using original tiles to fix the damaged areas. It’s a technique I’ve used before so I was confident it would work.

He was happy with this suggestion so I agreed to return later that week to complete the restoration.

Victorian Hallway Floor Blackwood Before Repair

Repairing and Cleaning an Original Victorian Tiled Hallway

My first task was to carefully remove the tiles around the exiting matt well, clean off the cement, and, in some cases, skim the thickness off some tiles so that they would position flat against the adjacent tile. Next, I proceeded to fix these replacement tiles in the areas required.

After completing these repairs, I moved on to cleaning the entire hallway. First, I manually scraped off as much of the paint and cement deposits from the surface of the tiles as possible, before cleaning the floor thoroughly with a mixed solution of three products: Tile Doctor Pro Clean, Tile Doctor NanoTech HBU Remover, and Tile Doctor Remove and Go.

Each of these products serves a different purpose. Pro Clean is reliable and powerful alkaline tile cleaner, while NanoTech HBU is a powerful cleaner which uses nano-sized particles to penetrate the pores of the tile and dissolve ingrained dirt and stains. Remove and Go strips away any old sealers, along with any of the stubborn paint and cement deposits.

The solution was left to dwell on the floor for about half an hour, before I scrubbed it into the stone by hand using a coarse black scrubbing pad. The floor was then rinsed thoroughly, before Tile Doctor Grout Clean-Up was applied using a wire wool pad remove light grout smears (grout haze) and signs of efflorescence.

I then completed the grouting of the floor left it to dry for half an hour before giving it a final wipe with a sponge.

Victorian Hallway Floor Blackwood During Restoration

Sealing a Victorian Tiled Hallway

After leaving the floor to dry out overnight, I returned to the property the following morning. I ran some quick checks for moisture to see if the tiles were ready to be sealed.

Thankfully, the floor proved dry and I could proceed the applying Tile Doctor Seal and Go. This sealer works really well on Victorian tiles and provides a nice subtle sheen finish whilst providing stain resistance.

The customer had initially thought the floor could not be salvaged, but now he will be able to enjoy this fantastic original feature from years to come. It just goes to show that a bit of creativity and hard work really can make a difference.

Victorian Hallway Floor Blackwood After Restoration
 

Professional Victorian Tiled Hallway Restoration in South Wales

100+ Year Old Victorian Tiled Hallway Restored to New in Blackwood Read More »

old terrazzo hallway floor during polishing Bridgend

Dirty Terrazzo Floor Deep Cleaned, Burnished and Sealed in Bridgend

Terrazzo is a quite a bit different from the natural stone floors we most commonly work with. It’s a type of flooring material that was made popular by Venetian builders in Italy in the 1920s, but is ultimately descended from styles of design that date back hundreds of years. A typical Terrazzo floor consists of chips of marble or granite set in concrete and polished to result in a smooth surface.

This Terrazzo floor, installed in the hallway of a property in Bridgend, South Wales, was in relatively good physical condition, but it had clearly lost its shine due to the build-up of dirt and muck over the years. In fact, it was first installed in around 1940! The owner was keen to have it rejuvenated to its best possible condition, so they asked me to come in to see what I could do.

Old terrazzo hallway floor before polishing Bridgend Old terrazzo hallway floor before polishing Bridgend

Cleaning and Burnishing a Dirty Terrazzo Tiled Floor

My first course of action was to apply Tile Doctor Pro Clean liberally across the floor and leave it to dwell for a short period. This is a high alkaline cleaner that is designed to deal with light to moderate soil build-up, and to strip away any old sealer remaining on the floor. I scrubbed the product in using a black pad fitted to a rotary machine and vacuumed up the resulting cleaning with a wet-vac machine.

Next, to restore the shine to the floor, I undertook a process known as burnishing, which involves the application of diamond encrusted polishing pads. We will typically start with a Coarse grit pad to level off any uneven areas of the floor and grind down any particularly stubborn marks and stains. Then, we gradually refine the polish on the floor using Medium and Fine grit pads. A small amount of water is used as lubrication with each pad.

After I had finished applying the first three pads in our four-pad system, I gave the floor a thorough rinse and left it to dry overnight.

Old terrazzo hallway floor during polishing Bridgend

Sealing a Terrazzo Tiled Floor

I returned to the property the next day and immediately ran some damp tests to check for excess moisture issues, which one might expect with an old floor like this one. Thankfully, the floor proved dry – and I could finish the burnishing process with the fourth and final Very Fine diamond encrusted burnishing pad, which achieved a beautiful shine finish.

Finally, I sealed the floor with three coats of Tile Doctor Colour Grow, an impregnating sealer which provides robust protection and enhances the coloured patterns in the Terrazzo.

Old terrazzo hallway floor after polishing Bridgend Old terrazzo hallway floor after polishing Bridgend

As you can see from the photos above, the floor is looking so much more colourful and bright after a deep clean, polish and a fresh seal. The customer was over the moon!

Professional Restoration of a Dirty Terrazzo Tiled Floor in Bridgend

Dirty Terrazzo Floor Deep Cleaned, Burnished and Sealed in Bridgend Read More »

Victorian Hallway Penarth Before and After Restoration

Victorian Tiled Hallway Floor Restored in Penarth

This Victorian tiled hallway floor at a house in Penarth needed a deep clean and seal but also there was the added complication of what to do with the under stairs area as you will see in the photographs below. There were many options to consider and after many visits to the property to discuss various options we finally decided on adding new replacement tiles that complimented the main colour in the floor.

Victorian Hallway Penarth Before Restoration
This floor was in quite a bad state covered in paint splashes and cement after new damp proofing also under the staircase there were no tiles just cement which the customer hoped could be tiled. I assured the customer that they made the right choice by contacting Tile Doctor that they would be very happy with the outcome of their project.

Repairing a Victorian Tiled Hallway Floor

Using a Kango hammer I first removed all the cement from area under the stairs that was to be retiled to get the main mess out of way then scraped off as much cement and paint off the tiled surface as possible. Once this was done and the area clear I was able to re-cement the area to be tilled to the right level and once dry tile the area with tiles in the chosen colour from a company known as Original Style which produce good tile replicas.

Victorian Hallway Penarth During Restoration Victorian Hallway Penarth During Restoration

Deep Cleaning Victorian Hallway Floor Tiles

The floor was checked for moisture which proved dry and then cleaned with a mixture of Tile Doctor products including NanoTech HBU Remover (HBU stands for Heavy Build-up), Remove and Go to tackle the paint splashes and to ensure any sealers were removed and Pro-Clean which is another powerful cleaning product. All these products are safe to use on tiles floors and were worked into the tile and grout using a scrubbing pad fitted to a rotary machine.

Once the floor was clean the soiled cleaning solution was extracted from the floor using a wet vacuum and the floor then thoroughly rinsed down with water, again extracted using a wet vacuum. Problem areas were re-treated by hand and scraped using wire wool and Tile Doctor Grout Clean-up which is an acid product designed to remove cement stains and grout smears. The floor was then rinsed again to remove any product traces, dried as much as possible with the wet vacuum and left to dry off overnight.

Sealing a Victorian Floor Sealing

I came back the next day to seal the floor, checking the tiles for moisture first using a damp meter. To seal the tiles, I used Tile Doctor Seal and Go which adds that protective layer and a nice sheen to the floor.

Victorian Hallway Penarth After Restoration Victorian Hallway Penarth After Restoration

The replacement tiles blended in well with the original Victorian floor tiles which now following the deep clean and re-seal looks like a new installation.

Victorian Hallway Penarth Before Restoration
 

Restoring a Victorian Tiled floor hidden in South Wales

Victorian Tiled Hallway Floor Restored in Penarth Read More »

Victorian Tiled Hallway Before and After Cleaning Maesteg

Deep Cleaning and Sealing to Restore Original Victorian Tiles in Maesteg

The owners of this property in Maesteg, a town in the Llynfi Valley not too far from Port Talbot, had decided after many years to remove the carpet covering the downstairs hallway. Upon doing so they revealed some truly fantastic patterned Victorian tiles, and decided that instead of replacing the old carpet with new carpet, they would restore the condition of the original flooring.

Victorian tiled hallway before cleaning Maesteg Victorian tiled hallway before cleaning Maesteg

Whenever you remove carpet that has been hiding tiled flooring, it’s almost inevitable that you will find traces of rubber underlay, glue and cement deposits, and paint stains – or, in this particular case – a combination of all the above. The best course of action to bring original tiles back to their peak condition is to seek professional restoration. Everyday cleaning products and DIY methods rarely achieve the desired result. As the local Tile Doctor, these property owners contacted me to get the job done efficiently and effectively. Here’s how I did it.

Cleaning an Old Victorian Tiled Hallway Floor

Upon arriving at the property, I started by checking the floor for any inherent moisture problems. This was important to do considering that the tiles appeared quite old; thankfully there were no major issues that would have affected the restoration.

After checking for moisture, I began the cleaning process by manually scrapping off as much of the heavy glue and cement deposits as possible to clear the area and give the cleaning products an easier time of penetrating deep into the tiles.

I then mixed a strong cleaning solution consisting of three of our products: Tile Doctor Pro Clean, Remove and Go and NanoTech HBU. Pro Clean is a reliable cleaner that cans be used on most natural stone floors, Remove & Go helps with the removal of glues, adhesives, and old sealers, and NanoTech HBU uses nano-sized cleaning particles to penetrate beneath tough stains, dissolve them, and lift them out.

This solution was worked into the tiles using a rotary machine fitted with a coarse black pad, before I rinsed the floor thoroughly. Then, on my hand and knees, I carefully checked every tile for any additional paint splashes or other deposits, using a handheld scraper and wire wool in combination with Tile Doctor Grout Clean Up to remove any I came across. This cleaning method for this type of floor is generally always successful.

Sealing a Victorian Tiled Hallway Floor

After leaving the floor to dry overnight I returned to the property, once again checking for moisture. Happy that the floor was ready to be sealed, I applied six coats of Tile Doctor Seal and Go, which not only provides a protective layer but also gives the tiles to a beautiful low sheen finish. Seal and Go is best suited for use on internal, porous surfaces such as Victorian, Quarry, Sandstone and Slate.

The two photos below show the outcome of the restoration. The transformation achieved in the space of one day was exceptional and needless to say the customer was over the moon with their new Victorian tiles.

Victorian tiled hallway after cleaning Maesteg Victorian tiled hallway after cleaning Maesteg


Professional Victorian Tiled Hallway Restoration in South Wales

Deep Cleaning and Sealing to Restore Original Victorian Tiles in Maesteg Read More »

Victorian Tiled Floor Restoration Pont Canna

Heavily Soiled and Damaged Victorian Tiled Hallway Restored in Pontcanna

Pontcanna is a popular residential area in the western district of Cardiff, in South East Wales. Known for its rather large houses and spectacular foliage, interestingly enough roughly a quarter of the population are English folk.

I was called down to a property in the area to take a look at a Victorian tiled floor which was in quite poor condition. Along with the typical amount of dirt and muck seen on poorly maintained tiles, there were a number of missing tiles and a fair bit of cement caked on the surface of the floor.

Victorian Tiled Floor Restoration Pontcanna
It would require a robust clean, fresh seal, and several repairs to get this floor back into optimum condition.

Cleaning and Repairing a Dirty Victorian Tiled Floor

To begin, I checked for excess moisture problems using a damp meter in various places of the hallway floor and, thankfully, it was showing dry results. Any dampness could have potentially caused problems later on in the restoration process, so it was s good idea to run tests before starting.

Next, I manually scraped as much of the dry paint and cement off the tiles as possible, with no lubrication necessary. I then proceeded to clean the floor with a solution I mixed early, consisting of equal parts Tile Doctor NanoTech HBU and Tile Doctor Pro Clean, rinsing as I went. Both products are designed to tackle heavy soil build-up, with the former uniquely using nano-sized particles (as the product name suggests) to penetrate deep into difficult to reach areas in the tiles in order to lift out ingrained muck.

Following the initial clean, I removed all of the loose tiles and those heavily affected by cement, before retiling as necessary with fresh Victorian tiles, and grouting the whole floor. Of course, these replacement tiles were carefully sourced to ensure consistency, as far as possible, with the original pattern of the floor.

Victorian Tiled Floor Restoration Pontcanna
The next day, I went over the whole floor with an application of the acid-based Tile Doctor Grout Clean Up, diluted with a little alkaline Pro Clean to form a cleaning solution. I then used a black pad to scrub the cleaner into the tiles, similarly to the previous day’s cleaning. This was followed by a through rinse with water to neutralise the floor.

It was at this point that I noticed some stubborn cement stains remained so I set about breaking them down using a 60 grade hand held diamond polishing block, and this technique proved successful.

Sealing a Victorian Tiled Floor

After completing the clean, I left the floor to dry out for roughly 24 hours. Upon my return to the property to seal the tiles, I tested again for moisture. It is recommended to run damp tests before sealing, as excess moisture can cloud the sealer, affecting its performance in the long run.

Victorian Tiled Floor Restoration Pontcanna
Fortunately, no dampness was detected and I was proceeded to seal the floor with seven coats of Tile Doctor Seal & Go, which enhances the natural colours in the stone and provides a nice satin gloss appearance, as requested by the customer.

Victorian Tiled Floor Restoration Pontcanna
I was extremely pleased with the results of this restoration, as was the customer. The extent of the soil build up and damage was such before the restoration that, after completion, the floor looked like it had been newly laid!

Victorian Tiled Floor Restoration in South Wales

Heavily Soiled and Damaged Victorian Tiled Hallway Restored in Pontcanna Read More »

Black and white chequer Victorian Tiles Cardiff After

Victorian Chequer Tiled Hallway Floor Deep Cleaned in Cardiff

Sometimes you survey a job and you know that if you get the chance to restore it the results will be totally fantastic! This was the case with this Victorian black & white chequer tiled floor in the hallway of a large terraced Victorian house in Cardiff which dated back to around 1900 and was now looking well past its best, I know this because my family used to live in the house opposite. It was a well laid floor with no readings of dampness; I believe it’s imperative you check a floor for dampness before starting so you know what the baseline damp level is and which sealers will work with the floor.

Black and white chequer Victorian Tiles Cardiff Before Black and white chequer Victorian Tiles Cardiff Before

Deep Cleaning a Victorian Tiled Floor

My first action was to hoover the floor and then scrape as much debris off the surface as possible, and then as always I mixed 50/50 Tile Doctor HBU (Heavy Build-Up) remover with Pro-Clean and on this occasion because I wanted the white tiles to become really white I added the same amount of Tile Doctor Grout Clean-Up. This special recipe created a very formidable and strong cleaning solution which is what the job called for. I swept it over the whole floor letting it soak in for about ten minutes and then worked it into the floor using a scrubbing machine fitted with a coarse black pad adding more of the solution to the floor where it was drying out as I went.

Black and white chequer Victorian Tiles Cardiff During Cleaning Black and white chequer Victorian Tiles Cardiff During Cleaning

The next step was to rinse the floor twice with water and extract the now filthy cleaning solution using a wet vacuum. At this point I inspected the tiles and I could see there were still a few stubborn areas with spots of paint and glue which I addressed with a decorators steam plate together with a scraper and hand held scrubbing pad.

I was now happy that the floor was clean and ready to be sealed, before sealing though it’s important to remove any trace of cleaning solution as it may contaminate the sealer so I gave the floor a thorough rinse and extracted as much of the water as possible to reduce drying times.

Sealing a Victorian Floor Sealing

I left the floor to dry for 48hrs before coming back to seal the tiles taking a reader on my damp meter first to establish they had indeed dried out. To seal the floor I used eight coats of Tile Doctor Seal & Go which really works well on Victorian tiles and in this case made the whites really stand out.

Black and white chequer Victorian Tiles Cardiff After
The customer wanted this floor to look good because they were selling the property and were due to have an open day. The clean tiles really gave the house the wow factor and period features are so desirable these days so I don’t think it will take long to sell.

Black and white chequer Victorian Tiles Cardiff After
 

Victorian Tiled floor restored in South Wales

Victorian Chequer Tiled Hallway Floor Deep Cleaned in Cardiff Read More »

Victorian Tiled Floor Pontcana After Cleaning and Sealing

1920’s Victorian Tiled Hallway Floor Restored in Pontcana

The new owner of this house in Pontcana, Cardiff recently discovered a 1920’s Victorian tiled floor hidden under carpet in the hallway and was keen to restore it as an original feature. They contacted Tile Doctor to have it repaired and I popped round to do a survey. I could see there was a great deal of movement in the floor by the front door area where the old brittle cement base had buckled causing the tiles to become loose and uneven.

Victorian Tiled Floor Pontcana Before Repairs
Most contractors would consider this beyond repair however I suggested we take up the main area of buckled tiles and keep them for the repair to the centre of the hallway where a copper strip had been laid in the cement. I suggested that in the area which we lifted up the tiles by the front door that we made a mat well which not only looks good but serves a purpose and remedies the main problem of the cement base.

Repairing a Victorian Tiled Hallway Floor

The first task was to check moisture readings then to remove the tiles carefully as I could in order to save the pieces for the repair of the other damage in the centre of floor. I then chiselled the raised areas of cement away with a small Kango hammer in preparation for the self-leveller which would be needed to make the base suitable for the new doorway mat.

Victorian Tiled Floor Pontcana Starting Repairs Victorian Tiled Floor Pontcana Removing Damaged Section

Once this was done I proceeded to repair the other damaged parts of the floor using the original tiles that were now spare. I laid the tiles through the damaged areas and grouted them in.

Victorian Tiled Floor Pontcana Before Repairs Victorian Tiled Floor Pontcana During Grouting

Once the grout had gone off I was able to start cleaning the floor starting with an application of Grout Clean-Up to remove the grout smears followed by a solution of Tile Doctor HBU mixed 50/50 with Pro-Clean which was scrubbed into the tile and then rinsed off before steam cleaning the floor to make sure any dirt or trace of chemical was removed before sealing the tiles.

Victorian Tiled Floor Pontcana After Repairs

Sealing a Victorian Floor Sealing

The floor was left to dry out and I returned two days later to seal the floor checking that the moisture readings were acceptable first. To seal the floor I used six coats of Tile Doctor Seal and Go which can even make an old floor look vibrant.

Victorian Tiled Floor Pontcana After Cleaning and Sealing
The floor now looks great and I’m confident the restoration of this period feature will add value to the property.

Victorian Tiled floor hidden under carpet fully restored in South Wales

1920’s Victorian Tiled Hallway Floor Restored in Pontcana Read More »

Terrazzo Hallway after deep cleaning near Caerphilly Castle

Deep Cleaning a Terrazzo Hallway near Caerphilly Castle

I previously restored an Quarry Tiled floor for the owner of this residence near Caerphilly Castle and was asked back to deep clean their Terrazzo hallway floor which was far from looking its best.

Terrazzo Hallway before deep cleaning near Caerphilly Castle Terrazzo Hallway before deep cleaning near Caerphilly Castle

Restoring a Terrazzo Floor

Terrazzo is a very hard surface and needs to be burnished to get the best results so after scrubbing the floor with Tile Doctor Pro-Clean and a black scrubbing pad to remove what felt like 100 plus years of black dirt I set about burnishing the floor with a set of diamond encrusted burnishing pads and a little water. The set comprises of four different grades of diamond pads ranging from coarse to smooth that produce a shiny clean surface. The floor is rinsed between pads to remove any slurry from the process and given another rinse at the end.

Sealing a Terrazzo Floor

The hard Terrazzo soon dried and I was able to seal the floor with the application of three coats of Tile Doctor Colour Grow which is a colour enhancing impregnating sealer which will prevent staining and make it easier to clean in future. Once the last coat was dry I and gave the floor a further polish with the 4th stage green pad to give a true deep shine.

Terrazzo Hallway after deep cleaning near Caerphilly Castle Terrazzo Hallway after deep cleaning near Caerphilly Castle

I think you will agree that what was once an old and tired terrazzo hallway floor now looks much better following its facelift, something that was only made possible due the quality of installation when first laid.

Quarry Tiled floor restored in South Wales

Deep Cleaning a Terrazzo Hallway near Caerphilly Castle Read More »

Full Victorian Floor Restoration Cardiff Finished

Full Restoration of a Victorian Tiled Hallway Floor in Cardiff

Never give up is how I would describe this job!!! I initially surveyed the floor in this Cardiff kitchen in November 2014 and finally completed it and the end of February 2015 working on it off and on as I searched for right tiles to match the existing.

On my survey the Victorian tiled floor which the customer was hoping to restore was covered over by ceramic tiles which the customer agreed to remove before my next visit so I could carry out a cleaning sample. Additionally there was an area of flooring which needed to blend in with kitchen as the pantry wall that previously separated it had been knocked down.

The ceramic tiles were removed and I came round to carry out a cleaning sample in what I thought was one of the more heavily soiled areas; I used Tile Doctor Remove & Go combined with another Tile Doctor product called NanoTech HBU which stands for Heavy Build-up Remover. The results were successful and it was decided to go ahead with the restoration.

Full Victorian Floor Restoration Cardiff Exposing the tiles Full Victorian Floor Restoration Cardiff Exposing the tiles

During my visit I tested for moisture and in general the readings were good with the highest reading of 12 in different parts of the floor.

Fully Restoring a Victorian Tiled Floor

To restore the tiles I set about cleaning adhesive and grime off using a combination of Tile Doctor Nanotech HBU and Pro Clean which was left to dwell and soak in for two hours before scrubbing with a rotary machine fitted with a black scrubbing pad. I tried this for a while and found it was not removing the dirt as expected and on inspection I discovered that the inner body of the ceramic tile was still stuck to the floor. It seems the when the customer removed the ceramic tiles they had only managed to remove the top layer of the tile and had left the lower part stuck to the floor. This Job was now becoming a nightmare as the solution would be to chip and scrape away tiny pieces of the remaining tile away so I could reach and clean the original Victorian floor.

Full Victorian Floor Restoration Cardiff Scraping Off Adhesive Full Victorian Floor Restoration Cardiff Scraping Off Adhesive

I had suggested to the customer that it might be cheaper to replace the whole floor but he was adamant that we should continue with our original plan and try to do the best job possible so never giving up I was happy to oblige.

In between cleaning the floor I prepared the base adjacent to the original floor with levelling compound. Also with the cleaning in progress I was getting a better look at the Victorian tiles which were now starting to appear and I could see how badly damaged which would have to be replaced.

Full Victorian Floor Restoration Cardiff Levelling Compound Full Victorian Floor Restoration Cardiff laying replacement tiles

The hallway floor had to be cut at the kitchen doorway as it protruded into the kitchen which when the door was closed looked odd so the customer was happy with my suggestion. I made different suggestions for the new floor layout, and colours which we felt complimented each floor pattern , the new tiles were purchased from original style and the local reclamation yard but I did have to cut the back off a few because of different thickness.

Full Victorian Floor Restoration Cardiff Trimming reclaimed tiles Full Victorian Floor Restoration Cardiff Laying new tiles

I finished fixing the replacement tiles and laying the new tiles in a pattern that we had agreed and in a style that best matched the original floor.

Full Victorian Floor Restoration Ready for sealing

Sealing a Victorian Floor Sealing

After all the work undertaken including the tilling of the area attached to the original I gave the whole floor a final and thorough steam clean which I did on a the Friday leaving it to thoroughly dry out over the weekend so I could move onto sealing early the following week.

Unfortunately when I arrived on Monday I discovered patches of efflorescence had appeared on certain tiles and I was still unable to finish the job. To resolve this the tiles needed to be given an wash down with Tile Doctor Grout Clean-up diluted 50/50 with water; this did the trick so I gave the floor another rinse with water and left to dry overnight.

When I returned the next day I checked for moisture which was a borderline reading of 15-16 so using a heat gun applied some warmth to the whole floor making sure to let it cool down before sealing with a coat of Tile Doctor Colour Grow which is an impregnating sealer that occupies the pores in the tile to prevent dirt from becoming ingrained there. Next I applied three coats of Tile Doctor Seal and Go which added a nice sheen to the floor and really brought out the vibrant reds in the tile. The following day I returned to do some tiling on wall above the cooker so applied a further three coats of Seal and Go to the floor to ensure it was fully sealed.

Full Victorian Floor Restoration Cardiff Finished Full Victorian Floor Restoration Cardiff Finished

If you have read this story through to the end you will appreciate that this was a mammoth job however it was satisfying to do and the final result looks fantastic, needless to say both myself and the customer were very happy with the end result.

Victorian Tiled floor hidden under ceramic tiles fully restored in South Wales

Full Restoration of a Victorian Tiled Hallway Floor in Cardiff Read More »

Victorian Tiled Floor Renovation Port Talbot After

Damaged Victorian Tiled Hallway Refurbished in Port Talbot

A customer in Port Talbot discovered an original but damaged Victorian Tiled Floor, circa 1890, hidden under laminate flooring in their hallway and were keen to restore it back to its original condition. They trawled the Internet and discovered Tile Doctor, made contact and a visit was arranged to conduct a survey.

The Victorian floor tiles were in a poor condition and to make matters worse a central heating pipe had been laid through the width of the hallway floor destroying the Victorian tiles. I assured the owners something could be done and we made a booking for me to return and do the work; in the meantime I spent a considerable amount of time sourcing tiles with the right measurements to replicate the original. Fortunately I managed to find a close match with a tile supplier called Original Style.

Victorian Tiled Floor Renovation Port Talbot Before Victorian Tiled Floor Renovation Port Talbot Before

Restoring Victorian Floor Tiles

My first task was as always to check for moisture then to scrape as much adhesive and paint off the tiles as possible; then resorting to a chisel and small jackhammer tool around all the edges of the area to be replaced to remove any more badly damaged tiles.

Victorian Tiled Floor Renovation Port Talbot During Victorian Tiled Floor Renovation Port Talbot During

I could see from the start I was going to need all the assistance I could get to clean this floor and lifts the stains out so to deep clean the tiles I applied Tile Doctor Remove and Go mixed 50/50 with NanoTech UltraClean which adds fine abrasive particles to an already powerful coatings remover. I brushed the solution over the whole floor and then went over it with a rotary machine fitted with a black scrubbing pad. I then left it to soak in for at least an hour before going over it again with the machine. Next the floor was rinsed with water to remove the worst of the dirt and to enable further attention to be focused on the more stubborn stains. Further cleaning was required so I covered the tiles in Tile Doctor Pro Clean which is a strong alkaline cleaning product and then rinsed the floor again scrapping off any old paint and stubborn glue residue in the process.

The floor was looking much improved but there were still areas with light cement smears and deeply ingrained dirt so this time I applied Tile Doctor Grout Clean-up which is an acid based product so you can’t leave it on too long but it’s the only effective way to treat mineral type deposits. I wanted to be sure all this product was removed so afterwards the floor was rinsed three times using a wet vacuum to remove the water. Once I was satisfied the floor was clean I applied a levelling compound to the area damaged by the heating pipes for the new base so I could tile it the following day.

Victorian Tiled Floor Renovation Port Talbot Before Victorian Tiled Floor Renovation Port Talbot During

Repairing a Victorian Tiled Floor

On the second day I started by cutting larger tiles into small pieces as the tiles were only certain sizes available from the tile supplier, but the colour match was nearly perfect so I made do. Next I started to tile the area using a fast setting adhesive so I could grout the tiles the same day. Once everything had set I gave the rest of the floor a final steam clean to make sure there was no trace of chemical that could upset a sealer.

Victorian Tiled Floor Renovation Port Talbot Before Victorian Tiled Floor Renovation Port Talbot During

Sealing a Victorian Floor Sealing

I left the floor to dry out over the weekend and then came back on the Monday to seal the tiles with Tile Doctor Seal and Go which is ideal for this type of tile as it adds a nice shine. I applied three coats leaving and interval in-between so it could dry before applying the next coat.

The customer was delighted with the results and that she chose Tile Doctor to do the work, we were not the cheapest quote she had received but you have to admit the floor looks like new so well worth the money.

Victorian Tiled Floor Renovation Port Talbot After Victorian Tiled Floor Renovation Port Talbot After


Victorian Tiled floor restored in South Wales

Damaged Victorian Tiled Hallway Refurbished in Port Talbot Read More »

Quarry Tiles After Restoration in Cardiff

Quarry Tiled Hallway Floor Restored in Cardiff

This Red and Black Quarry tiled floor was discovered underneath a laminate floor in the hallway of a house built in Cardiff around 1910. The customer was keen to restore it as an original feature and I was confident that despite the damaged tiles, cement and paint we would be able to do so.

Quarry Tiles Before Restoration in Cardiff

Cleaning a Quarry Tiled Floor

The area around the doorway was in the worst condition and unfortunately those tiles were beyond rescue and needed to be replaced which wasn’t a problem as with a bit of research you can usually find what you need.

The next step was to carefully scrape as much cement and old paint off the tile surface as possible by hand and remove the waste; I also tested the floor at this point for dampness at the doorways as its good to know if there are any damp problems that may require additional attention. I then applied undiluted Tile Doctor Remove and Go to the whole floor with a brush agitating as I went, it was left it on for about an hour to break down any old sealers and coatings before being rinsed off with clean water twice which was then hovered up with a wet vacuum.

The next stage was to remove the cement using Tile Doctor Grout Clean-Up which being an acid based products starts to work as soon as it’s applied to the tile, this was worked in using a small hand held scrubbing brush before being given a good rinse down with clean water.

The last step of the cleaning process was to steam clean the tiles to open up the pores and ensure that no trace of cleaning agents was left behind that could upset the sealer.

Quarry Tiles After Restoration in Cardiff

Sealing a Quarry Floor Sealing

The floor was left to dry for two days before and I came back the next day to seal it. Before sealing however I wanted to be use it had dried out sufficiently so I tested it again use a Stanley hand held meter, the previous reading I took proved to be a useful benchmark. Sealing was done using two coats of Tile Doctor Seal and Go which really brought the floor back to life and lifted the lovely colours in the tile. Needless to say the customer was delighted with the restoration of the floor.

Quarry Tiled floor restored in South Wales

Quarry Tiled Hallway Floor Restored in Cardiff Read More »

Scroll to Top