Nanotech HBU

Art Deco Encaustic Tiled Floor Restoration Cardiff

Damaged Art Deco Encaustic Cement Tiled Floor Fully Restored in Cardiff

Tile Doctor was contacted by a client who had recently purchased a 1920’s property in Cardiff with a Encaustic Tiled floor that was in a bad state. The property was having major building works carried out to bring it back to its original condition and this included the tiled floor.

Art Deco Encaustic Tiled Floor Before Restoration Cardiff

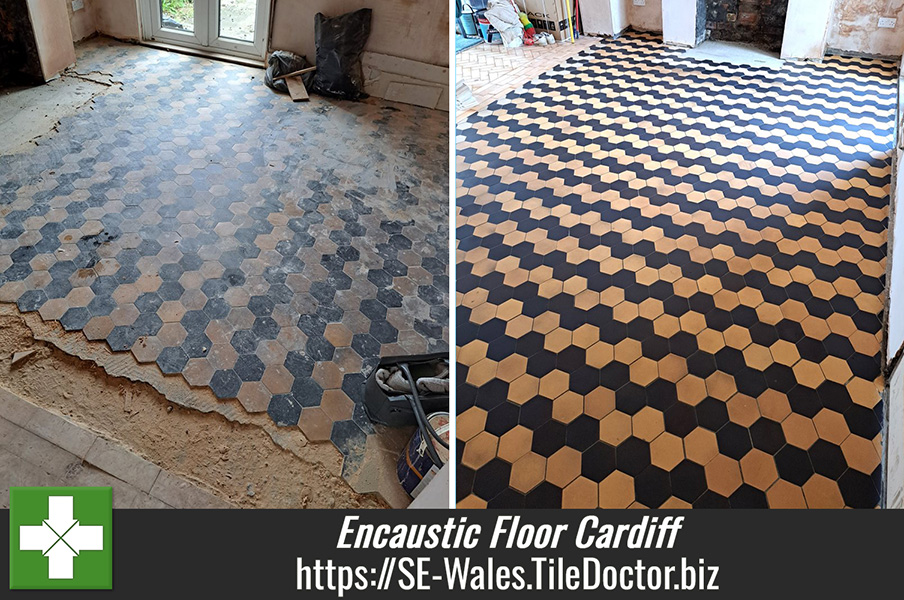
The floor in general was in a very bad condition with builders’ plaster and cement staining in many areas, and to make things worse a lot of tiles were missing and damaged. Normally replacing tiles isn’t a problem but these particular tiles were very uncommon in colour shape and size and the pattern was very reminiscent of the Art Deco designs that were fashionable when the house was built.

Art Deco Encaustic Tiled Floor Before Restoration Cardiff Art Deco Encaustic Tiled Floor Before Restoration Cardiff

Having surveyed the floor I came up with a restoration plan and explained that it should be possible cut the shape out of a larger tile and try to match the colour as best as possible. Once the clients and I decided on the closest colour I was then able to plan the restoration project in detail and provide an accurate quote.

Cleaning and Repairing an Art Deco Encaustic Tiled Floor

Before we could even contemplate cleaning the floor it had to be whole so the 1st job was to prepare the damaged areas for tile replacements. This involves carefully removing the damaged tile and cleaning up the foundation beneath ready to accept a replacement.

Next step was to cut all the replacement tiles to replicate the octagonal shape and size then dry fit them to check if any adjustments were needed. Once all the replacement tiles had been cut, they were fixed in place with flexible adhesive and then grouted. The floor then needed time to set before cleaning so that was it for the first day.

On day two work stated to deep clean the encaustic tiled floor of previous sealers and paint. To do this it was covered in a strong dilution of Tile Doctor Pro-Clean combined with Tile Doctor Nanotech HBU Remover for extra power. This was left to soak into the floor for a good fifteen minutes before scrubbing it by hand with a black scrubbing pad cut to size. Working it into the floor like this is less aggressive than with a machine and ensures 100% coverage with no gaps in the cleaning. Once done the floor was rinsed and the soiling extracted with a wet vacuum.

The next stage was to clean the floor working at 1 m2 at a time, again with a coarse black pad cut from a 17″ Tile Doctor pad. This time the pad was used to work in Tile Doctor Grout Clean-up into the surface to remove the cement smears. As work progressed the floor was rinsed with fresh water and all the residues vacuumed away. Working this way allowed me to keep progressing until I was satisfied the whole floor was clear and as clean as it ever could be.

The floor was then left for two days so it would be completely dry for the next step of applying a protective sealer.

Sealing an Art Deco Encaustic Tiled Floor

The client wanted a natural matt finish to the floor, so I had recommended sealing it with Tile Doctor Colour Grow which is a colour enhancing impregnating sealer that leaves a very durable matt finish.

Colour Glow allows for vapour transmission which is essential on old floors like this one that don’t have a damp proof membrane. The sealer soaks into the pores of the cement tile protecting it from within and ensure dirt remains on the surface where it can be easily cleaned away.

Art Deco Encaustic Tiled Floor After Restoration Cardiff

The clients were delighted with the results and relieved I was able to restore the floor as an original feature. They were told by other contractors that the floor would have to be removed and replaced at a substantial cost.

For aftercare cleaning I advised the use of Tile Doctor Neutral Tile Cleaner which is a mild yet effective tile cleaner that won’t impact the sealer.


Professional Restoration of an Art Deco Encaustic Cement Tiled Floor in Southeast Wales

Damaged Art Deco Encaustic Cement Tiled Floor Fully Restored in Cardiff Read More »

Stone Bathroom Tiling Renovation Cowbridge

Restoring the Appearance of Bleach Damaged Stone Tiling in Cowbridge

Last year we were approached by a customer in the market town of Cowbridge looking for a professional bathroom restorer to renovate their stone tiled bathroom. Apparently, their cleaner had etched the tiles using neat bleach unaware of the damage a strong product like that could have on natural stone.

Stone Bathroom Tiling Before Cleaning Cowbridge

I arranged to call in on the customer the next time I was in the area to discuss the work and take a close look at the tiling. Three different types of stone had been used in the bathroom with Limestone wall tiles in the shower, Black Marble mosaics formed the shower tray and bath panelling, and the floor had been laid with Black Slate.

Having discussed the bathroom at length with the customer it was clear that their main concerns were that the stone had lost its shine, the grout had discoloured, and a lot of the silicone was stained and needed replacing. I worked out a comprehensive plan to revive the bathroom and created a detailed quotation to do the work that listed all the necessary work. My customer was happy with the quote, and I got the go ahead to book the work in.

Black Marble Mosaic and Limestone Shower Tiling Before Cleaning Cowbridge Black Slate Bathroom Floor Tiling Before Cleaning Cowbridge

Renovating a Stone Bathroom Tiles

Before starting the cleaning, I spent some time protecting the fragile surfaces that didn’t need attention with protective sheeting.

Stone Bathroom Tiling Before Cleaning Cowbridge

Next the shower Tile and grout was scrubbed with a strong dilution of Tile Doctor Pro-Clean and a Black pad that I had cut down so it could be used by hand. The shower walls were then rinsed with water using the shower head which is one of the convenient advantages of working in a shower.

Focus then shifted to the Black Mosaic tiles on the floor of the shower using more Pro-Clean this time mixed with Nanotech HBU for extra cleaning power. This was scrubbed into the grout joints with a brush and a Black pad for the tile surface. I used the same process on the Marble mosaic bath panel. Once done the tiles were rinsed with water.

The next step was to cut out the silicone sealant around the permitter of the shower tiling and spray the area with Tile Doctor Duo Clean which kills mould. Once dry the silicone was replaced with a new anti-mould silicone.

Black Marble Mosaic and Limestone Shower Tiling After Renovation Cowbridge

The shower enclosure tiles were then sealed with Tile Doctor Pro-Seal a durable sealer that doesn’t alter the appearance of the stone. The customer liked the light appearance of the Limestone and wanted to keep it that way.

Limestone Shower Wall Tiling After Renovation Cowbridge

Refreshing Black Slate Bathroom Flooring

The last area to focus on were the Black Slate tiles on the bathroom floor which were also in a similar worn condition. The old sealer had clearly broken down on these and was now letting dirt become ingrained in the stone reducing the vibrant appearance of the Black Slate. I tread this by removing what was left of the original sealer with an application of Remove and Go mixed with Nanotech HBU and Pro-Clean. I left this cleaning cocktail to dwell for about half an hour before scrubbing with a coarse black pad and scrubbing brush.

The floor was then rinsed with water to remove the soiling and now looked much improved. Once dry it was sealed with Tile Doctor Colour Grow which is an impregnating sealer that contains a colour enhancer and provides a durable finish especially in bathrooms. This worked out very well on the Slate helped to add depth to the stone as well as bringing out more of the features in the stone.

Black Slate Bathroom Floor Tiling After Renovation Cowbridge

The customers were delighted with the result and I’m please to say the service, in fact they have since recommended Tile Doctor to their friends, colleagues and family.


Marble Tiled Shower Cubicle Professionally Refinished in South Wales

Restoring the Appearance of Bleach Damaged Stone Tiling in Cowbridge Read More »

Tiled Pathway Restoration Pontcanna Cardiff

Old Quarry Tiled Pathway Restoration in Pontcanna Cardiff

Tile Doctor was contacted by a homeowner from the Pontcanna area of Cardiff about the Quarry tiled path leading up to their property. A local tile restoration company had told them that their pathway was beyond repair and had advised replacing it with new tiles at significant cost. I’m based in Cardiff and cover Southeast Wales so the enquiry was past along to myself.

Tiled Pathway Before Restoration Pontcanna Cardiff

I contacted the client and arranged a survey which confirmed the pathway was indeed in a very poor condition. Lots of tiles were missing or cracked all of which would need replacing and some of the exposed concrete foundation would also need work.

I assured the client that I could make it look respectable again without spending a fortune. They were more than happy with my affordable restoration plan and accepted the quote. Work like this is best done during dry weather so we waited until there was a good weather window before starting.

Repairing a Quarry Tiled Path in Cardiff

The first task was to carry out the large number of repairs and replacements including breaking the damaged sections of concrete foundation. The various areas were then cleaned up and the foundation rebuilt where necessary.

Tiled Pathway During Restoration Pontcanna Cardiff Tiled Pathway During Restoration Pontcanna Cardiff

Once the foundation had set, work started on the tiling using new similar colour tiles along the borders and main path that I was able to source before starting work. The whole pathway was then grouted in using a durable cementitious filler.

Once the new tiles had set firmly and grout hardened, I started the cleaning process.

Deep Cleaning a Quarry Tiled Path in Cardiff

Working from the front door as it’s on a slope to the street pavement I applied a mixture of Tile Doctor Pro-Clean combined 50:50 with Tile Doctor Nanotech HBU to the tiles and allowed it to soak in. After about fifteen minutes the solution was worked into the tiles one square metre at a time by hand using a coarse black pad cut from a 17-inch pad. Once the pathway was cleaned, I rinsed the whole area with clean water and extracted the waste using a wet vacuum.

Tiled Pathway During Restoration Pontcanna Cardiff

The next stage was to rinse the pathway with neat Tile Doctor Grout Clean-up. This is scrubbed in to remove old cement, some of which must have been 100 years old. Once done the soiling was extracted and the path was given a final rinse with water.

Sealing a Tiled Pathway

The final stage was to seal the pathway tiles. Fortunately, we had a dry spell for a week or two otherwise I would have had to wait for a weather window to ensure the tiles were dry before sealing. Applying sealer to damp external tiles will lock in the moisture which would then freeze over winter causing it to expand and disrupt the sealer.

Once the floor had time to dry for a couple of days it was checked for moisture and proved within the limits to take a sealer. The chosen Sealer was Tile Doctor Colour Grow which is a very durable sealer as it’s an impregnator, meaning it soaks into the body of the tile preventing dirt from residing there.

Tiled Pathway After Restoration Pontcanna Cardiff

As you can once complete the path looked fantastic and the colour enhancing formula in the sealer highlighted the vibrant reds in the tile bringing the whole project to life. The client was delighted and recommended Tile Doctor to many friends, family and neighbours in the street.

Tiled Pathway After Restoration Pontcanna Cardiff


Professional Restoration of a Quarry Tiled Path in Cardiff

Old Quarry Tiled Pathway Restoration in Pontcanna Cardiff Read More »

Quarry Tiled Floor Restoration Penarth

Red Quarry Tiled Floor Restoration in Penarth

This client from Penarth contacted Tile Doctor to see if their 100-year-old Quarry tiled floor which had broken and missing tiles could be salvaged. The property dated back to 1890 and had experienced many years of wear and tear and it certainly showed. One of the biggest problems however would be to renovate the area in front of the old fireplace where a hearth was once situated.

Quarry Tiled Floor During Restoration Penarth

It was clear the area in front of the fireplace would need to be rebuilt using matching replacement quarry tiles more of which would be needed for the other repairs that needed doing. Once that was done the floor would then need a deep clean and a fresh sealer applied to give the whole floor a consistent appearance.

I worked out a comprehensive quote which included the repairs and renovation work. This was accepted by the client and a date set for the work to start.

Cleaning and Repairing a Quarry Tiled Room

Work started with the tile repairs which involved breaking out the damaged tiles and those in front of the old fireplace and then cleaning up the floor ready for the replacement tiles to be installed.

Quarry Tiled Floor During Restoration Penarth

Quarry tiles are still very popular, so it wasn’t a problem finding matching replacements which I had manage to source before work commenced. The replacements were then laid in-line with the existing tiles using rapid set adhesive and grouted in.

Once the tiles had set, I was able to start the cleaning process which started with scraping off as much cement, paint, and plaster residue off the floor as possible. This was then followed up with a deep clean of the tile and grout using a mixture of Tile Doctor Pro-Clean combined 50:50 with with Tile Doctor Nanotech HBU Cleaner.

After leaving these products to soak in for ten minutes I worked by hand scrubbing in 1m2 sections at a time, cleaning and rinsing with water and vacuuming up the waste with a wet vacuum as I progressed. Doing it this way ensures maximum attention to detail and ensures the floor is as clean as possible.

Once done, the floor was given an acid rinse using Tile Doctor Grout Clean-up which was brushed onto the floor and extracted with the wet vacuum as before. Old floors like this don’t have a damp proof membrane and are susceptible to efflorescence, giving the floor an acid rinse like this counters salts and helps further clean the tiles.

After another rinse and extraction with the wet vacuum the floor was left overnight to dry.

Sealing a Quarry Tiled Floor in Penarth

The next morning the floor was tested for moisture with a damp meter and the readings confirmed it had dried sufficiently to accept a sealer. I don’t recommend sealing a damp floor as it impacts the sealers’ ability to cure and leads to a patchy finish.

Sealing started with the application of a single coat of Tile Doctor Colour Grow which is a very durable and breathable sealer which being an impregnator provides an excellent base. The customer wanted a shiny finish so this was followed up with a couple of coats of Tile Doctor Seal and Go. This product further protects the floor and adds a subtle shine which together with the Colour Grow really brought out the colours in the Quarry tiles. As you can see the red colour of the floor looks vibrant and stunning after the two different sealers were applied.

Quarry Tiled Floor After Restoration Penarth

My client was delighted with the result and offered to recommended Tile Doctor to their family and friends which was nice. For aftercare I recommended the use of Tile Doctor Neutral Tile Cleaner which is a gentle but effective tile cleaner that’s ideal for cleaning sealed floors.

Quarry Tiled Floor After Restoration Penarth


Professional Restoration of a Quarry Tiled Floor in South Wales

Red Quarry Tiled Floor Restoration in Penarth Read More »

Geometric Mosaic Edwardian Floor Restoration Cardiff

Edwardian Geometric Mosaic Tile Restoration in Cardiff

Earlier this year I was contacted by a homeowner in Cardiff to see if anything could be done to save their Edwardian tiled hallway floor. They had previously contacted another local company who advised to remove the floor and have it retiled. They felt upset to hear this news, having discovered the tiles under the hallway carpet and realised they must be original from when the house was built in 1910. Ideally, they wanted this original feature restored and so they reached out to us.

Geometric Mosaic Edwardian Floor Before Restoration Cardiff

Having spoken to them over the phone I was happy to re-assure them that the floor could be restored and arranged a visit to survey the floor and carry out a cleaning test to see what could be achieved.

Geometric Mosaic Edwardian Floor Before Restoration Cardiff Geometric Mosaic Edwardian Floor Before Restoration Cardiff

The floor although in a bad way was very impressive, someone had clearly spent a lot of time laying down a mosaic of what must have been thousands of small square tiles arranged in a repeating geometric pattern. During the visit I realised extensive tile repairs would be required however the sample clean proved successful and the clients were delighted.

Geometric Mosaic Edwardian Floor Test Clean Cardiff

I worked out a quote for the restoration which they were happy to accept, and a date was arranged for my return.

Repairing and Cleaning Edwardian Mosaic Floor Tiling

Work started with tile repairs which were done with replacement tiles cut to size, secured with adhesive and grouted in. The floor was then left to set hard before moving onto the next step of cleaning.

Before the carpet had been installed a thin layer of self-levelling cement had been spread across the floor and this had to be removed. To do this I carefully scraped off as much cement as possible along with paint splashes and remnants of plaster all of which were marking the tiles. The waste from this was then swept and bagged up.

To get the floor clean, a mixture of Tile Doctor Nanotech HBU and Pro-Clean were mixed together and applied to the surface working on one square meter at a time. The solution was rinsed, worked in with a Black scrubbing pad and then rinsed again before being extracted with a wet vacuum with clean water and then vacuumed away.

After carrying out the same procedure on the rest of the floor I then started the second procedure which was to apply Tile Doctor Grout Clean-up using wire wool to remove all the cement residues. Again, this was rinsed off with clean water and vacuumed away as I worked.

These two processes removed all the dirt and contaminants from the floor leaving the tiles clean, after a final rinse I used the wet vacuum again to get the tiles as dry as possible and ready for sealing the next day.

Sealing an Edwardian Mosaic Tiled Hallway Floor

The clients wanted a satin shine finish so after leaving the floor to dry overnight it was tested for moisture the next day and this confirmed the floor was dry enough for their desired sealer application.

The choice of sealer was Tile Doctor Seal & Go which produces a lovely satin finish and highlights the colours. Another advantage is being a water-based product it doesn’t leave a smell as it dries.

The floor responded really well to the treatments and I’m please to say the owners were delighted with the final result and eager to recommend Tile Doctor to their family and friends.

Geometric Mosaic Edwardian Floor After Restoration Cardiff Geometric Mosaic Edwardian Floor After Restoration Cardiff

The sealer will protect the floor by ensuring dirt remains on the surface where it can be easily cleaned away using a sealer sensitive tile cleaner such as Tile Doctor Neutral Tile Cleaner.

Geometric Mosaic Edwardian Floor After Restoration Cardiff


Professional Restoration of an Edwardian Mosaic Floor Tiling in South Wales

Edwardian Geometric Mosaic Tile Restoration in Cardiff Read More »

1930 Geometric Tiled Floor Cleaning Cardiff

Cleaning and Sealing a Victorian Tiled Hallway Floor in Cardiff

A homeowner from Cardiff was in touch earlier this year regarding their 1930’s Geometric tiled floor more commonly referred to a Victorian. These floors are created using encaustic cement tiles benefit greatly from being sealed to prevent dirt from becoming ingrained in the tile and in this case the sealer had worn off some years ago.

1930 Geometric Tiled Floor Before Cleaning Cardiff

I paid a visit to the property to survey the floor and come up with a restoration plan and produce a quote for work. It was clear that the floor had seen many years of heavy foot traffic since it had been last renovated and now you could see black staining building up on the tile. This had not gone unnoticed by the owner and wanted the floor restoring to its former glory.

1930 Geometric Tiled Floor Before Cleaning Cardiff

I worked out a quote which was accepted and we agreed a date for the work to start.

Deep Cleaning a Victorian Tiled Hallway Floor

To get the floor clean I created a 50:50 solution of two Tile Doctor products, Pro-Clean and Nanotech HBU Remover. The two products combine to create a very powerful alkaline tile cleaning product. The solution was applied neat to approximately one square meter at a time and after leaving it to soak for ten minutes it was worked in using a hand size scrubbing pad cut from a Black 17-inch floor pad.

This is an aggressive pad which helps shift the dirt with the help of the products which penetrate the pores of the tile to lift out the ingrained dirt. After working on the area for around five to ten minutes at a time it was rinsed with water and the soiling extracted with a wet vacuum.

The next step was to repeat the process using Grout Clean-up which is an acidic cleaning product that helps to further clean up the tiles, removing old cement residues and will dissolve any efflorescent salts that may be present in the floor. After another rise and extraction, I was able to move on to the next square meter.

Hallways lend themselves well to this approach as you can start at one end and progress down the floor, working in this manner also ensures each meter is checked and any issues are resolved as you progress.

One the whole floor had been cleaned in this way it was left to dry off overnight.

Sealing a Victorian Tiled Hallway Floor

The following day I returned and first used the damp meter to check that the floor was dry enough to seal. Satisfied with the results I began with the application of the first coat of sealer which for this floor we used Tile Doctor Seal and Go. This sealer provides a satin shine finish which also enhances the deep vibrant colours of the tiles.

1930 Geometric Tiled Floor After Cleaning Cardiff

The customer was delighted with the results so much that they asked me to return later to restore the Red Quarry tiled floor in there dining room. Before leaving I took time to discuss aftercare cleaning for which I recommended the use of Tile Doctor Neutral Tile Cleaner, this is a gentle but effective tile cleaning product designed for use on sealed floors that will ensure easy maintenance and keep the floor in great condition.

1930 Geometric Tiled Floor After Cleaning Cardiff


Professional Restoration of a Victorian Tiled Hallway in South Wales

Cleaning and Sealing a Victorian Tiled Hallway Floor in Cardiff Read More »

Black and White Geometric Victorian Tiled Hallway Floor After Renovation Llantwit Major

Classic Victorian Tiled Geometric Floor Renovated in Llantwit Major

This client from Llantwit Major contacted Tile Doctor regarding their Victorian tiled hallway floor which was a classic Black and White geometric design but was now stained and in need of renovation. I’m the local Tile Doctor agent covering Cardiff and the surrounding area, so they asked me to pop over and take a look.

Black and White Geometric Victorian Tiled Hallway Floor Before Renovation Llantwit Major Black and White Geometric Victorian Tiled Hallway Floor Before Cleaning Llantwit Major

I contacted the client to arrange a viewing so I could survey the tiles and assess the work involved. The floor had been previously covered in carpet which was glued to the tiled floor. On removal of the carpet, traces of the glue were visible and heavy residues were thick in places. I worked out a quote for re-fixing the loose tiles, deep cleaning the floor and then applying a protective sealer, happy to get the work done the quote was agreed and a date scheduled.

Black and White Geometric Victorian Tiled Hallway Floor Before Cleaning Llantwit Major Black and White Geometric Victorian Tiled Hallway Floor Before Cleaning Llantwit Major

Repairing and Cleaning a Victorian Tiled Hallway Floor

Work started by addressing the loose tiles which were then carefully removed and cleaned up for re use. The gaps left were also cleaned up and the tiles stuck back in place using a quick setting adhesive. I also added new metal trims to the doorway thresholds.

I scraped as much of the glue from the floor surface with a heavy-duty razor blade tool. Then I mixed a solution of Tile Doctor Remove & Go with Tile Doctor Nanotech HBU and a little Tile Doctor Pro-Clean. The combined solution was left to dwell for approximately half an hour before agitating with a course black pad. The dirty solution was then rinsed off with water and removed with a wet vacuum. I repeated this process on a couple of particularly stubborn stains.

The floor was then given an acid wash using neat Tile Doctor Grout Clean-up to remove any old cement residues. Finally, the floor was rinsed again with clean water and dried with a wet vacuum. The floor was then left to dry off fully overnight.

Sealing a Victorian Tiled Hallway Floor

I returned the following morning to check if the floor had dried out. I used a damp meter to take a few moisture readings, which were within the acceptable level. This is particularly important on a floor of this age as there was no damp-proof membrane installed and as a result can take longer to dry out.

Black and White Geometric Victorian Tiled Hallway Floor After Renovation Llantwit Major Black and White Geometric Victorian Tiled Hallway Floor After Renovation Llantwit Major

The client wanted a low maintenance hard wearing sealer applied, so I selected Tile Doctor Colour Grow which soaks into the pores of the tiles protecting it from within, it also contains a colour enhancer which brought out the contrast in the Black and White tiles. Lastly this sealer is fully breathable and so will allow moisture to rise through the tile and evaporate at the surface; this is an important consideration when selecting a sealer for a floor without a damp proof membrane.

Black and White Geometric Victorian Tiled Hallway Floor After Renovation Llantwit Major

Once complete the floor was transformed, and the client was very happy with the outcome. I recommended for maintenance to use Tile Doctor Neutral Tile Cleaner which will ensure the floor keeps its appearance.


Professional Restoration of a Victorian Tiled Hallway in South Wales

Classic Victorian Tiled Geometric Floor Renovated in Llantwit Major Read More »

Victorian Tiled Hallway Floor Restoration Merthyr Tydfil

Damaged Victorian Tiled Hallway Floor Restored in Merthyr Tydfil

Tile Doctor was approached by a client in Merthyr Tydfil who was hoping something could be done to improve their beautiful Victorian tiled hallway floor which had been patched up with concrete during the installation of pipework under the floor.

Victorian Tiled Hallway Floor Before Restoration Merthyr Tydfil

I paid a visit to the property to run some tests, recommend a way forward and provide a quote for restoring the floor. The restoration would need to start with the patched section by removing the cement backfill and then re-tiling with matching replacements. Then to ensure the whole floor looked uniform it would need deep cleaning and sealing.

Keen for the floor to be repaired I was given the go ahead and so I started a search for replacement tiles that would be a good match for the floor. Fortunately, I was able to source some replica tiles from Tile Doctor who have had a selection of similar tiles available from other jobs they had done.

Repairing a Victorian Tiled Hallway Floor

Work started by removing the old doormat and carefully cutting out the concrete backfill that went across the floor.

Victorian Tiled Hallway Floor Before Restoration Merthyr Tydfil

The rubble was carefully removed and the newly exposed cleaned up so it could be levelled with self-levelling compound which would provide a new base onto which the replacement tiles could be laid.

Victorian Tiled Hallway Floor During Restoration Merthyr Tydfil

Floor tile replacements were then cut to shape and fixed in place with a rapid setting adhesive and grouted in using a grey grout similar to the original colour.

Victorian Tiled Hallway Floor During Restoration Merthyr Tydfil

Deep Cleaning a Victorian Tiled Hallway Floor

The floor was left to set overnight and I came back then next day to begin the cleaning process. For this I created a cocktail of three Tile Doctor cleaning products, namely Tile Doctor Pro-Clean, Remove & Go and Tile Doctor HBU Nanotech Cleaner. The products were mixed, diluted with water, and then sprayed onto the tiles. The floor was left for ten minutes to allow the products to soak into the pores of the tile and digest the dirt and coatings such as old sealers.
The floor was then scrubbed with a black pad fitted to a rotary machine to release the dirt etc from the tiles. Afterwards, the floor was rinsed thoroughly with water and the soiling extracted using a wet vacuum.

Next the floor was treated to an Acid Wash using Tile Doctor Grout Clean-Up which is a mild acid that removes grout haze, cement smears and counters any alkaline salts which may have built-up in the tile and could result in efflorescence later.

Finally, another rinse with clean water and the floor was then dried as much as possible with the wet vacuum. The floor was left to dry overnight.

Sealing a Victorian Tiled Hallway Floor

The following day I returned and first used the damp meter to check that the floor was dry enough to seal. Satisfied with the reading I chose to use Tile Doctor Colour Grow to seal the floor. This is an impregnator which soaks into the surface of the tiles and provides a matt look with a very hard-wearing protective seal, perfect for a high traffic area. It allows for the lovely colours of the tiles to shine through.

Victorian Tiled Hallway Floor After Restoration Merthyr Tydfil

The floor responded very well to the treatment and it was impossible to tell where the repair work had taken place. For aftercare cleaning I recommended the use of Tile Doctor Neutral Tile Cleaner, this is a gentle but effective tile cleaning product designed for use on sealed floors that will ensure easy maintenance and keep the floor in great condition.


Professional Restoration of a Victorian Tiled Hallway in South Wales

Damaged Victorian Tiled Hallway Floor Restored in Merthyr Tydfil Read More »

Terracotta Floor Deep Cleaned and Sealed Cardiff

Terracotta Tiled Kitchen Floor Cleaned and Sealed in Cardiff

This Terracotta tiled floor was installed at a property in Cardiff around twenty years ago. It hadn’t been professional cleaned since installation and in that time any sealer that was once present had worn off and dirt had built up in the pores of the tile. Terracotta works very well in a Kitchen but you do need to maintain the sealer otherwise the tiles will start to absorb dirt which is very difficult to remove with standard equipment.

Terracotta Flooring Before Cleaning Cardiff

After speaking to the owner on the phone we arranged a time for me to pop over, survey the floor and test clean the tile and grout to work out the best method for cleaning it. The test went very well and proved the floor could be restored to an almost new condition, impressed with the result I was booked in to complete the job.

Terracotta Floor Before Cleaning Cardiff

Deep Cleaning a Terracotta Tiled Kitchen Floor

The test clean I conducted earlier enabled me to work out which Tile Doctor products had worked best to bring the floor back to life. With this in mind I was able to start work with a clear plan which in this case involved applying a combination of Tile Doctor Pro-Clean, Nanotech HBU and Tile Doctor Remove and Go. These are all tile cleaning products and have different properties. HBU for instance stands for Heavy Build-Up and is good for handling a large amount of dirt and Remove and Go is a stripper that can remove paint stains and old sealers.

Terracotta Floor During Cleaning Cardiff

This mixture was applied to the floor and left to soak in for about fifteen minutes before being scrubbed into the floor. Scrubbing started with the grout which was done manually with a hand-held scrubbing brush. This was followed up with a Black Scrubbing pad fitted to a rotary floor buffer.

Terracotta Floor During Cleaning Cardiff Terracotta Floor During Cleaning Cardiff

Once done the floor was rinsed with water and the soiling extracted using a wet vacuum. The Terracotta tile and grout was then inspected and the whole process repeated multiple times until I was satisfied all the ingrained dirt was gone and the floor was as clean as it possibly could be.

The next step would be to seal the floor but it would need it to be dry first. The trouble with Terracotta however is it’s a porous material and retains water during the cleaning process. So, to assist with drying a fan was placed on the floor after I finished the cleaning of a section.

Sealing a Terracotta Tiled Floor

I returned the next morning and tested the tiles with a damp meter to ensure the tiles were dry before applying the sealer. All was well, so I started with the application of the first coat Tile Doctor Seal and Go which is a water-based sealer that works well on clay tiles and adds a lovely sheen finish to the floor. Due to the porous nature of Terracotta, it took eight coats of Seal and Go before it was completely sealed.

Terracotta Floor During Sealing Cardiff

The clean and new sealer really lifted the appearance of the kitchen much to the delight of my customer who was very happy with their new floor. For aftercare cleaning I recommended Tile Doctor Neutral Tile Cleaner which is a mild but effective cleaning product designed for use on sealed tiles.

It’s also worth knowing that the life of a sealer greatly depends on what you use to clean it as most tile cleaning products you find in a supermarket are only designed for use on Ceramic or Vinyl flooring and are simply too strong for use on a sealed tile (always read the label!).

Terracotta Floor After Cleaning Sealing Cardiff Terracotta Floor After Cleaning Sealing Cardiff


Professional Cleaning of a Terracotta Tiled Floor in Cheshire

Terracotta Tiled Kitchen Floor Cleaned and Sealed in Cardiff Read More »

Scroll to Top