tile repair

Victorian Tiled Kitchen Floor Restoration Penarth

Victorian Tiled Kitchen Floor Repair and Restored in Penarth

Following a recommendation, this client from Penarth contacted Tile Doctor to carry out a survey on their Victorian tiled kitchen floor and come up with a plan for its restoration. Always happy to provide advice and guidance I arranged a date to pop over and take a look.

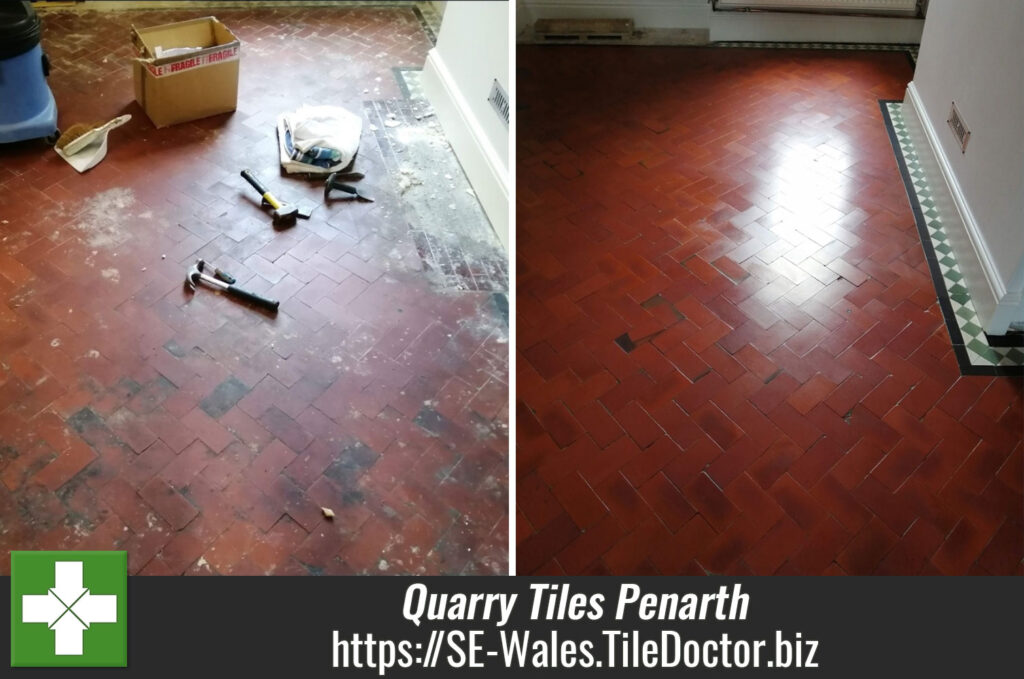
As you can see from the photographs on this page the floor was in very poor condition with many tiles needing replacing and a section missing adjacent to the wooden floor. Many stains were visible due to years of neglect as previous builders used it to mix cement and plaster.

Victorian Tiled Kitchen Floor Before Restoration Penarth Victorian Tiled Kitchen Floor Before Restoration Penarth

Undeterred I advised that the floor could be restored using replacement tiles to match the existing and then with deep cleaning and sealing it should be transformed. I worked out a quote for the restoration which they were happy with.

Cleaning and Repairing a Victorian Tiled Kitchen

After sourcing suitable replacement tiles the first job was to remove the broken and damaged areas of tiling and clean up the base ready for tiling. This is slow and careful work as the replacements had to be cut to match the existing pattern. Once the tiles were ready, they were dry fitted into place to ensure the pattern was correct before being fixed in place with a flexible adhesive and fresh grouting.

Victorian Tiled Kitchen Floor During Restoration Penarth

The floor was left to set overnight, and I came back the next day to start the cleaning.
As this floor was heavily soiled with a variety of different substances, I mixed a variety of Tile Doctor products to achieve the most effective way to lift the stains. The mixture contained a litre of Tile Doctor Pro-Clean, Tile Doctor Remove and Go together with Tile Doctor HBU Nanotech, all of which provide different capabilities and were combined in a container which was then shaken to mix the contents.

The cleaning progressed at 1m2 at a time scrubbing the surface with a handheld pad cut from a 17″ Tile Doctor Burnishing Pad, scrubbing the pitted areas with a scrubbing brush, rinsing with clean water and vacuuming up as I worked.

Once the floor was clean it was then given an acid rinse using Tile Doctor Grout Clean-up to help neutralise efflorescent salts and remove cement smears. Being acidic it also neutralises the floor after cleaning with the alkaline products used earlier.

Sealing a Victorian Tiled Kitchen

The floor was left to dry for 2 days as it had a considerable amount of liquids applied during the cleaning process.

The chosen sealer was Tile Doctor Colour Grow which is a durable tile impregnator. It also acts as a base coat for the next sealer applied which was Tile Doctor Seal & Go which provides a satin shine finish and enhances the rich colours. Both sealers allow for vapour transmission (aka breathable) which is important feature for floors laid without a damp proof membrane.

Victorian Tiled Kitchen Floor After Restoration Penarth

The floor looked stunning once complete and my clients was delighted with the service and finish of the floor. They have also passed on Tile Doctors contact details to family and friends.

Victorian Tiled Kitchen Floor After Restoration Penarth

For aftercare I recommended the use of Tile Doctor Neutral Tile Cleaner which is a mild yet effective tile cleaning product that safe to use on sealed surfaces.


Professional Restoration of a Victorian Tiled Kitchen in Southeast Wales

Victorian Tiled Kitchen Floor Repair and Restored in Penarth Read More »

Art Deco Encaustic Tiled Floor Restoration Cardiff

Damaged Art Deco Encaustic Cement Tiled Floor Fully Restored in Cardiff

Tile Doctor was contacted by a client who had recently purchased a 1920’s property in Cardiff with a Encaustic Tiled floor that was in a bad state. The property was having major building works carried out to bring it back to its original condition and this included the tiled floor.

Art Deco Encaustic Tiled Floor Before Restoration Cardiff

The floor in general was in a very bad condition with builders’ plaster and cement staining in many areas, and to make things worse a lot of tiles were missing and damaged. Normally replacing tiles isn’t a problem but these particular tiles were very uncommon in colour shape and size and the pattern was very reminiscent of the Art Deco designs that were fashionable when the house was built.

Art Deco Encaustic Tiled Floor Before Restoration Cardiff Art Deco Encaustic Tiled Floor Before Restoration Cardiff

Having surveyed the floor I came up with a restoration plan and explained that it should be possible cut the shape out of a larger tile and try to match the colour as best as possible. Once the clients and I decided on the closest colour I was then able to plan the restoration project in detail and provide an accurate quote.

Cleaning and Repairing an Art Deco Encaustic Tiled Floor

Before we could even contemplate cleaning the floor it had to be whole so the 1st job was to prepare the damaged areas for tile replacements. This involves carefully removing the damaged tile and cleaning up the foundation beneath ready to accept a replacement.

Next step was to cut all the replacement tiles to replicate the octagonal shape and size then dry fit them to check if any adjustments were needed. Once all the replacement tiles had been cut, they were fixed in place with flexible adhesive and then grouted. The floor then needed time to set before cleaning so that was it for the first day.

On day two work stated to deep clean the encaustic tiled floor of previous sealers and paint. To do this it was covered in a strong dilution of Tile Doctor Pro-Clean combined with Tile Doctor Nanotech HBU Remover for extra power. This was left to soak into the floor for a good fifteen minutes before scrubbing it by hand with a black scrubbing pad cut to size. Working it into the floor like this is less aggressive than with a machine and ensures 100% coverage with no gaps in the cleaning. Once done the floor was rinsed and the soiling extracted with a wet vacuum.

The next stage was to clean the floor working at 1 m2 at a time, again with a coarse black pad cut from a 17″ Tile Doctor pad. This time the pad was used to work in Tile Doctor Grout Clean-up into the surface to remove the cement smears. As work progressed the floor was rinsed with fresh water and all the residues vacuumed away. Working this way allowed me to keep progressing until I was satisfied the whole floor was clear and as clean as it ever could be.

The floor was then left for two days so it would be completely dry for the next step of applying a protective sealer.

Sealing an Art Deco Encaustic Tiled Floor

The client wanted a natural matt finish to the floor, so I had recommended sealing it with Tile Doctor Colour Grow which is a colour enhancing impregnating sealer that leaves a very durable matt finish.

Colour Glow allows for vapour transmission which is essential on old floors like this one that don’t have a damp proof membrane. The sealer soaks into the pores of the cement tile protecting it from within and ensure dirt remains on the surface where it can be easily cleaned away.

Art Deco Encaustic Tiled Floor After Restoration Cardiff

The clients were delighted with the results and relieved I was able to restore the floor as an original feature. They were told by other contractors that the floor would have to be removed and replaced at a substantial cost.

For aftercare cleaning I advised the use of Tile Doctor Neutral Tile Cleaner which is a mild yet effective tile cleaner that won’t impact the sealer.


Professional Restoration of an Art Deco Encaustic Cement Tiled Floor in Southeast Wales

Damaged Art Deco Encaustic Cement Tiled Floor Fully Restored in Cardiff Read More »

Quarry Tiled Floor Restoration Penarth

Red Quarry Tiled Floor Restoration in Penarth

This client from Penarth contacted Tile Doctor to see if their 100-year-old Quarry tiled floor which had broken and missing tiles could be salvaged. The property dated back to 1890 and had experienced many years of wear and tear and it certainly showed. One of the biggest problems however would be to renovate the area in front of the old fireplace where a hearth was once situated.

Quarry Tiled Floor During Restoration Penarth

It was clear the area in front of the fireplace would need to be rebuilt using matching replacement quarry tiles more of which would be needed for the other repairs that needed doing. Once that was done the floor would then need a deep clean and a fresh sealer applied to give the whole floor a consistent appearance.

I worked out a comprehensive quote which included the repairs and renovation work. This was accepted by the client and a date set for the work to start.

Cleaning and Repairing a Quarry Tiled Room

Work started with the tile repairs which involved breaking out the damaged tiles and those in front of the old fireplace and then cleaning up the floor ready for the replacement tiles to be installed.

Quarry Tiled Floor During Restoration Penarth

Quarry tiles are still very popular, so it wasn’t a problem finding matching replacements which I had manage to source before work commenced. The replacements were then laid in-line with the existing tiles using rapid set adhesive and grouted in.

Once the tiles had set, I was able to start the cleaning process which started with scraping off as much cement, paint, and plaster residue off the floor as possible. This was then followed up with a deep clean of the tile and grout using a mixture of Tile Doctor Pro-Clean combined 50:50 with with Tile Doctor Nanotech HBU Cleaner.

After leaving these products to soak in for ten minutes I worked by hand scrubbing in 1m2 sections at a time, cleaning and rinsing with water and vacuuming up the waste with a wet vacuum as I progressed. Doing it this way ensures maximum attention to detail and ensures the floor is as clean as possible.

Once done, the floor was given an acid rinse using Tile Doctor Grout Clean-up which was brushed onto the floor and extracted with the wet vacuum as before. Old floors like this don’t have a damp proof membrane and are susceptible to efflorescence, giving the floor an acid rinse like this counters salts and helps further clean the tiles.

After another rinse and extraction with the wet vacuum the floor was left overnight to dry.

Sealing a Quarry Tiled Floor in Penarth

The next morning the floor was tested for moisture with a damp meter and the readings confirmed it had dried sufficiently to accept a sealer. I don’t recommend sealing a damp floor as it impacts the sealers’ ability to cure and leads to a patchy finish.

Sealing started with the application of a single coat of Tile Doctor Colour Grow which is a very durable and breathable sealer which being an impregnator provides an excellent base. The customer wanted a shiny finish so this was followed up with a couple of coats of Tile Doctor Seal and Go. This product further protects the floor and adds a subtle shine which together with the Colour Grow really brought out the colours in the Quarry tiles. As you can see the red colour of the floor looks vibrant and stunning after the two different sealers were applied.

Quarry Tiled Floor After Restoration Penarth

My client was delighted with the result and offered to recommended Tile Doctor to their family and friends which was nice. For aftercare I recommended the use of Tile Doctor Neutral Tile Cleaner which is a gentle but effective tile cleaner that’s ideal for cleaning sealed floors.

Quarry Tiled Floor After Restoration Penarth


Professional Restoration of a Quarry Tiled Floor in South Wales

Red Quarry Tiled Floor Restoration in Penarth Read More »

Tile Installation Problems Resolved in a Cardiff Bathroom

Tile Installation Problems Resolved in a Cardiff Bathroom

Sometimes my clients ask the question: “Why is the grout coming out of the joints in my bathroom floor, and what can I do about it?” This job at a house in the city of Cardiff had exactly that problem and I had been asked to resolve it, additionally one of the tiles had become cracked and need replacing.

Cracked Bathroom Floor Tile Repair Cardiff Cracked Bathroom Floor Tile Repair Cardiff

The cause was due to movement in the floor when walked on, causing the grout to dislodge from the tile; this is not uncommon on tiled floors where there is wooden base and there is a lack of flexibility in the adhesive, most likely because it was watered down upon initial installation or a flexible product was not used. In this case the floorboards outside the bathroom door would squeak when stepped on, suggesting that there was some degree of movement under the bathroom floor, making the substrate move very slightly – but enough to cause problems. All I could really do in this situation was to remove the existing grout with a small machine and re-grout the entire area using a highly flexible grout.

Cracked Bathroom Floor Tile Repair Cardiff Cracked Bathroom Floor Tile Repair Cardiff

These thoughts were confirmed when I came to replace one cracked tile in the centre of the floor. Upon removing the broken tile I saw that the tiles had been laid on 13mm of adhesive which was very brittle and soft, allowing it to be scraped off the tile and the floor easily. Only approximately 50% of the tile was covered in adhesive, suggesting that it had been laid rather carelessly. Tiles must have 100% adhesive coverage, especially in bathrooms with underfloor heating, because the heat and cold can directly impact the stone and cause cracks.

Cracked Bathroom Floor Tile Repair Cardiff Cracked Bathroom Floor Tile Repair Cardiff

Fortunately the customer had a spare tile and so I carefully chopped out the broken tile and removed the surrounding grout and adhesive causing no disruption to the surrounding area. The replacement tile was secured in place with adhesive and then grouted using a matching grout, this time using flexible products.

Cracked Bathroom Floor Tile Repair Cardiff Cracked Bathroom Floor Tile Repair Cardiff

The next job was to take a look at the shower cubicle where I was disappointed to see that the contractor who was responsible for the initial installation of the floor had used a very cheap silicone between the base and the shower wall. It was now mouldy and had de-bonded in places that it had to be cut out and replaced by a stronger, high quality silicone. Generally speaking, silicone should last more than 2-3 years (this floor had been installed in 2012).

Shower Tile Refresh Cardiff
I cut the old silicone out with a sharp knife, cleaned up the edges and replaced the silicone with a quality product.

Shower Tile Refresh Cardiff
The ceramic and mosaic tiles were in good condition so this really was just a case of resolving some installation problems however for general cleaning I would recommend Tile Doctor Stone Soap which is a new Biodegradable organic product ideal for cleaning bathroom tiles.


Bathroom Installation Problems Resolved in South Wales

Tile Installation Problems Resolved in a Cardiff Bathroom Read More »

1920’s Victorian Tiled Hallway Floor Restored in Pontcana

1920’s Victorian Tiled Hallway Floor Restored in Pontcana

The new owner of this house in Pontcana, Cardiff recently discovered a 1920’s Victorian tiled floor hidden under carpet in the hallway and was keen to restore it as an original feature. They contacted Tile Doctor to have it repaired and I popped round to do a survey. I could see there was a great deal of movement in the floor by the front door area where the old brittle cement base had buckled causing the tiles to become loose and uneven.

Victorian Tiled Floor Pontcana Before Repairs
Most contractors would consider this beyond repair however I suggested we take up the main area of buckled tiles and keep them for the repair to the centre of the hallway where a copper strip had been laid in the cement. I suggested that in the area which we lifted up the tiles by the front door that we made a mat well which not only looks good but serves a purpose and remedies the main problem of the cement base.

Repairing a Victorian Tiled Hallway Floor

The first task was to check moisture readings then to remove the tiles carefully as I could in order to save the pieces for the repair of the other damage in the centre of floor. I then chiselled the raised areas of cement away with a small Kango hammer in preparation for the self-leveller which would be needed to make the base suitable for the new doorway mat.

Victorian Tiled Floor Pontcana Starting Repairs Victorian Tiled Floor Pontcana Removing Damaged Section

Once this was done I proceeded to repair the other damaged parts of the floor using the original tiles that were now spare. I laid the tiles through the damaged areas and grouted them in.

Victorian Tiled Floor Pontcana Before Repairs Victorian Tiled Floor Pontcana During Grouting

Once the grout had gone off I was able to start cleaning the floor starting with an application of Grout Clean-Up to remove the grout smears followed by a solution of Tile Doctor HBU mixed 50/50 with Pro-Clean which was scrubbed into the tile and then rinsed off before steam cleaning the floor to make sure any dirt or trace of chemical was removed before sealing the tiles.

Victorian Tiled Floor Pontcana After Repairs

Sealing a Victorian Floor Sealing

The floor was left to dry out and I returned two days later to seal the floor checking that the moisture readings were acceptable first. To seal the floor I used six coats of Tile Doctor Seal and Go which can even make an old floor look vibrant.

Victorian Tiled Floor Pontcana After Cleaning and Sealing
The floor now looks great and I’m confident the restoration of this period feature will add value to the property.

Victorian Tiled floor hidden under carpet fully restored in South Wales

1920’s Victorian Tiled Hallway Floor Restored in Pontcana Read More »

Scroll to Top