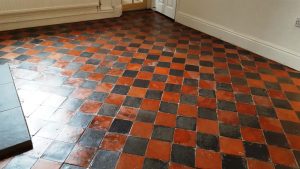
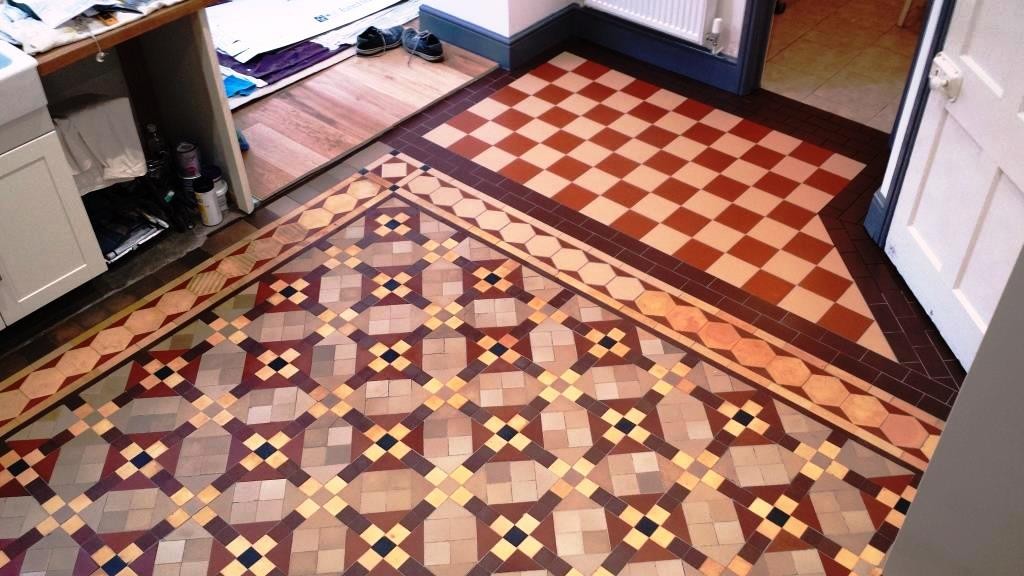
Cardiff

Terrazzo Hallway Floor Renovation Bishop of Wales Residence Cardiff

Terrazzo Hallway Floor Renovation in Cardiff for the Archbishop of Wales

After undertaking restoration work for Catholic churches in the areas of Wales and England over the past years, I was recommended to the team who maintain the personal residence of the Archbishop of Wales in Cardiff. They had decided to restore the Terrazzo flooring at the property and I was invited over to quote for doing the work.

The flooring had seen many years of wear and tear due to the nature of the building and the amount of footfall relating to meetings and staff. They were delighted to have found us and I was more than happy to get involved and be able to reassure them that I was confident the floor could indeed be restored to its former glory.

Terrazzo Floor Before Renovation Bishop of Wales Residence Cardiff Terrazzo Floor Before Renovation Bishop of Wales Residence Cardiff

I attended a meeting at the property with the church architect to discuss the work needed and talk about the history of the property. It turns out the floor had been covered in carpet and this had been giving people at the property an allergic reaction due to dust accumulating in its thick pile. After removal of the carpet, they discovered the original Terrazzo floor underneath and decided it would be best to have that renovated.

The Terrazzo suffered from numerous issues including adhesive staining and the imprinted pattern of the carpet underlay, fortunately however there were no cracks which can be an issue with Terrazzo floors of this age. Having surveyed the floor I explained the method of work needed to the architect, and we then agreed the price and arranged to carry out the work on a time schedule that suited.

Terrazzo Floor Before Renovation Bishop of Wales Residence Cardiff

Cleaning and Repairing a Terrazzo Tiled Hallway Floor

To start the restoration process, I began by scraping as much of the remaining adhesive and other contaminates off the surface of the floor with a handheld scraper attached with a 6-inch razor blade. Then I was able to run over the Terrazzo with a coarse 50-Grit diamond pad fitted to a rotary floor machine, this was followed by a 100-grit then 200-Grit pad to remove more ingrained residues. Water is used to lubricate this process and the slurry generated is rinsed off after the application of each pad and extracted with a wet vacuum.

The next stage was to polish the Terrazzo using a set of less aggressive burnishing pads, starting with a Tile Doctor 400-grit pad then a 800, 1500 pad again using water to lubricate the process, rinsing with water between pads and vacuuming the waste as I worked.

Sealing a Victorian Tiled Hallway Floor

The Terrazzo was left to dry out overnight and the following morning the floor was tested for moisture with a damp meter. I do this to avoid applying sealer to a damp floor which can lead to an uneven finish. In this case the readings were fine so I was able to move on to apply the sealer.

The sealer used was Tile Doctor Colour Grow which contains a colour enhancing ingredient that lifts the colours in the stone whilst providing a durable hard wearing sealed finish. Additionally, this product is fully breathable which is an important consideration when sealing old floors like this that won’t have a damp proof membrane.

Terrazzo Floor After Renovation Bishop of Wales Residence Cardiff Terrazzo Floor After Renovation Bishop of Wales Residence Cardiff

Once completed the entrance hall looked a lot more welcoming for visitors, more importantly the Archbishop and the Architect were delighted with the result as they were initially unsure if it could be restored.

Terrazzo Floor After Renovation Bishop of Wales Residence Cardiff

For aftercare cleaning going forward I recommended the use of Tile Doctor Neutral Tile Cleaner which is a mild but effective pH neutral cleaner that is safe to use on sealed floors and has a nice fresh smell.


Professional Restoration of a Terrazzo Tiled Hallway in South Wales

Terrazzo Hallway Floor Renovation in Cardiff for the Archbishop of Wales Read More »

Terracotta Floor Deep Cleaned and Sealed Cardiff

Terracotta Tiled Kitchen Floor Cleaned and Sealed in Cardiff

This Terracotta tiled floor was installed at a property in Cardiff around twenty years ago. It hadn’t been professional cleaned since installation and in that time any sealer that was once present had worn off and dirt had built up in the pores of the tile. Terracotta works very well in a Kitchen but you do need to maintain the sealer otherwise the tiles will start to absorb dirt which is very difficult to remove with standard equipment.

Terracotta Flooring Before Cleaning Cardiff

After speaking to the owner on the phone we arranged a time for me to pop over, survey the floor and test clean the tile and grout to work out the best method for cleaning it. The test went very well and proved the floor could be restored to an almost new condition, impressed with the result I was booked in to complete the job.

Terracotta Floor Before Cleaning Cardiff

Deep Cleaning a Terracotta Tiled Kitchen Floor

The test clean I conducted earlier enabled me to work out which Tile Doctor products had worked best to bring the floor back to life. With this in mind I was able to start work with a clear plan which in this case involved applying a combination of Tile Doctor Pro-Clean, Nanotech HBU and Tile Doctor Remove and Go. These are all tile cleaning products and have different properties. HBU for instance stands for Heavy Build-Up and is good for handling a large amount of dirt and Remove and Go is a stripper that can remove paint stains and old sealers.

Terracotta Floor During Cleaning Cardiff

This mixture was applied to the floor and left to soak in for about fifteen minutes before being scrubbed into the floor. Scrubbing started with the grout which was done manually with a hand-held scrubbing brush. This was followed up with a Black Scrubbing pad fitted to a rotary floor buffer.

Terracotta Floor During Cleaning Cardiff Terracotta Floor During Cleaning Cardiff

Once done the floor was rinsed with water and the soiling extracted using a wet vacuum. The Terracotta tile and grout was then inspected and the whole process repeated multiple times until I was satisfied all the ingrained dirt was gone and the floor was as clean as it possibly could be.

The next step would be to seal the floor but it would need it to be dry first. The trouble with Terracotta however is it’s a porous material and retains water during the cleaning process. So, to assist with drying a fan was placed on the floor after I finished the cleaning of a section.

Sealing a Terracotta Tiled Floor

I returned the next morning and tested the tiles with a damp meter to ensure the tiles were dry before applying the sealer. All was well, so I started with the application of the first coat Tile Doctor Seal and Go which is a water-based sealer that works well on clay tiles and adds a lovely sheen finish to the floor. Due to the porous nature of Terracotta, it took eight coats of Seal and Go before it was completely sealed.

Terracotta Floor During Sealing Cardiff

The clean and new sealer really lifted the appearance of the kitchen much to the delight of my customer who was very happy with their new floor. For aftercare cleaning I recommended Tile Doctor Neutral Tile Cleaner which is a mild but effective cleaning product designed for use on sealed tiles.

It’s also worth knowing that the life of a sealer greatly depends on what you use to clean it as most tile cleaning products you find in a supermarket are only designed for use on Ceramic or Vinyl flooring and are simply too strong for use on a sealed tile (always read the label!).

Terracotta Floor After Cleaning Sealing Cardiff Terracotta Floor After Cleaning Sealing Cardiff


Professional Cleaning of a Terracotta Tiled Floor in Cheshire

Terracotta Tiled Kitchen Floor Cleaned and Sealed in Cardiff Read More »

Travertine Floor Tile Cleaned Sealed Cardiff South Wales

Travertine Floor Tile Refresh in Cardiff

I actually laid this Travertine floor in Cardiff myself back in 2010 and since then it has experienced a lot of wear and tear. The floor was installed throughout the kitchen and adjacent diner which are some of the busiest rooms in the house, also the client owned dogs which spent a lot of time in the kitchen.

Travertine Floor Before Renovation Cardiff

Deciding it was high time for a refresh the client got in touch to have me return and to discuss some other tiling work they required. During my visit to look at the other work I could visibly see how much this floor needed a thorough renovation. Before starting work I suggested that I carry out a test clean on one tile to show what could be achieved. The demonstration worked well, and the client was delighted to see what could be achieved. This also helped me work out which cleaning products and methods would work best.

Travertine Floor Test Clean Cardiff

The property was close to the buzzing city of Cardiff, thankfully there was on site parking, which can be a bit of a problem when we work this near to the city. Over the years I have invested in a heavy rotary machine and vacuum extractor which give a better clean and makes the work more efficient.

Cleaning a Travertine Tiled Kitchen Diner Floor

Focusing on the grout I started to clean the floor with a handheld scrubbing brush and a strong dilution of Tile Doctor Pro-Clean and Tile Doctor Nano HBU tile cleaner which is also a stripper that helps to remove the old sealers and grease. These two combinations were worked into the tiles with a black scrubbing pad fitted to a rotary machine. Following that the floor was thoroughly rinsed with clean water and the soiling extracted with a wet vacuum.

Travertine Floor During Renovation Cardiff Travertine Floor During Renovation Cardiff

I was then able to see where the work had been effective on the travertine and grout and was able to identify stubborn areas and spot treat them by hand. Whilst doing this manually takes a little longer it is well worth the effort to achieve the best finish. Once I was satisfied the floor was left to dry overnight for the sealer to be applied.

Sealing a Travertine Tiled Kitchen Diner Floor

Returning the following morning, I used the damp meter to test that the floor was dry, the floor was then ready for me to apply the sealer. The choice of sealer for this floor was Tile Doctor Colour Grow which is also a colour enhancing impregnator. It soaks into the pores of the tiles rather than sitting on the surface.

Two coats of the sealer were applied, waiting for the first coat to dry before applying the next. Knowing they have two large dogs this sealer is usually my preferred choice as it is a very hard-wearing product.

Travertine Floor After Renovation Cardiff

Once complete the floor looked great, and the client was very happy with the work we carried out. We recommended the use of Tile Doctor Neutral Tile Cleaner which is pH neutral and will ensure they can maintain the floor moving forward.

Travertine Floor After Renovation Cardiff


Professional Renovation of a Travertine Tiled Kitchen Floor in South Wales

Travertine Floor Tile Refresh in Cardiff Read More »

Black Limestone Patio Restored in Cardiff

Cardiff Patio Ruined by a Builder Restored in Cardiff

This customer from Cardiff was in despair after a builder ruined her expensive Black Limestone Patio after using brick acid to clean it up. She contacted Tile Doctor in the hope that it could be saved and being their local agent, I was asked to contact her.

Black Limestone Patio Before Renovation Cardiff
I visited the property to assess the damage to the patio and it was immediately clear to me what needed to be done as this is not the first time I had come across this problem. It turns out the builder was attempting to remove cement splatters from the stone after applying render to the back of the property. Limestone is a sedimentary stone composed primarily of calcium carbonate which can be dissolved in acid, so using acid on Limestone is never a good idea.

Black Limestone Patio Before Renovation Cardiff

Cleaning a Limestone Tiled Patio Floor

I spent the first day removing the damage to the stone by burnishing the patio with a weighted buffer machine fitted with a 100-grit diamond pad lubricated with water and using a wet vacuum to remove the soiling it generates.

This was followed by a 200-grit, 400-grit and then finished with an 800-grit diamond pad until I had removed all the damage and resurfaced the Limestone. Again, water was used to lubricate the process and the floor was rinsed with fresh water after each pad and the soil extracted with a wet vacuum.

This work was done in August 2022 and I had purposely chosen a patch of good weather to do this work and was able to leave the patio to dry off overnight after another thorough round of rinsing with water and extracting.

Sealing a Limestone Tiled Patio Floor

I returned the next day to finish the renovation, first checking first that the stone was dry with the use of a damp meter. The readings were good, so I went ahead and applied the sealer. Secondly its recommended for outdoor use and is UV safe so should last a long time ensuring the patio will now be able to withstand the outside weather and the stone will be protected from the elements.

Black Limestone Patio Before Renovation Cardiff Black Limestone Patio Before Renovation Cardiff

The results were amazing, and my customer was relieved and delighted with the finished result allowing her to look forward to several summer garden parties that were planned.

Black Limestone Patio After Sealing Cardiff
 

Professional Restoration of a Black Limestone Tiled Patio in South Wales

Cardiff Patio Ruined by a Builder Restored in Cardiff Read More »

Terrazzo Hallway Floor Restored in Cardiff

Restoration of a 1930s Terrazzo Hallway Floor in Cardiff

Tile Doctor were appointed to restore a 1930’s Terrazzo hallway floor in Cardiff which was deeply ingrained with dirt after being covered with carpet for many years. Rather than coving the floor with carpet again the owner had decided it was time to have it restored having had our services recommended by a previous client.

After surveying the floor, I could see the carpet had been down so long you could see its pattern in the Terrazzo. I could see there was a large amount of ingrained dirt in the floor that would need to be flushed out which meant several cleans would probably be required. There were numerous cracks in the floor and in one area near a wall the Terrazzo had broken up and turned to rubble.

Terrazzo Hallway Floor Before Restoration Cardiff

Unfortunately, there was little that could be done to repair this, so we agreed to back fill it with cement and the owner planned to cover it with a timber boxing and then paint.

Terrazzo Hallway Floor Before Restoration Cardiff

Cleaning and Repairing a Terrazzo Tiled Hallway Floor

To get the Terrazzo looking its best I planned to remove the dirt and restore the surface by burnishing the floor with a six-stage diamond polishing process. This would involve applying Tile Doctor burnishing pads of differing grits ranging from very coarse to very fine, rinsing between each pad to extract the soiling.

To start I applied a strong dilution of Tile Doctor Pro-Clean and left it to dwell and soak into Terrazzo for a short time so it could get to work digesting and breaking down the dirt. The first pad was then applied which was a very coarse 100-grit pad using the Pro-Clean for lubrication. The combination of the two lifted out the dirt from the heavily soiled pores of the Terrazzo where it could be extracted from the surface with a wet vacuum.

Terrazzo Hallway Floor During Restoration Cardiff

This process was repeated working through each of the six different burnishing pads, rinsing the floor along the way and extracting the soil after each pad. It was an arduous task, but it was rewarding to see the floor slowly come back to life.

Terrazzo Hallway Floor During Restoration Cardiff

With the floor clean the next stage was to make repairs to the various cracks. Terrazzo is poured onto the floor in one go and then polished to leave a unique and hardwearing surface, so you can’t simply replace a tile or cut out a section. What you can do however is to fill the crack with a resin or flexible grout colour matched to the unique colours in the floor. Once the whole floor had been sealed the crack should be difficult to spot.

Sealing a Terrazzo Tiled Hallway Floor

The next step would be to seal and protect the floor however it needed to be fully dry first, so it was left to dry for twenty-four hours and when I returned this was confirmed by taking several moisture readings with a damp meter.

The sealer of choice for this floor was Tile Doctor Colour Grow which is a fully breathable impregnating sealer which also enhances the colour of the stone chippings in the Terrazzo. This sealer is an impregnator that works by soaking into the pores of the floor rather than sittings on the surface, thus protecting it from ingrained dirt. Hallways are by their very nature a high traffic area so this should provide adequate protection and keep the floor in good condition for a long period of time.

Terrazzo Hallway Floor After Restoration Cardiff

Colour Grow is however a matt finish and my client had requested a very high sheen finish. So, after leaving the sealer to dry for 24 hours I returned to apply a further product called Tile Doctor Shine Powder which is a crystalline powder that is worked into the floor using a white buffer pad running at slow speed.

Terrazzo Hallway Floor After Restoration Cardiff

The client was delighted with the newly restored floor, as you can see from the pictures it looked so much fresher and of course free of dirt, not bad for a 90-year-old floor. For the aftercare of polished Terrazzo, I recommend Tile Doctor Stone Soap which is compatible with the sealer and will help maintain the patina.


Professional Restoration of a Terrazzo Tiled Hallway in Southeast Wales

Restoration of a 1930s Terrazzo Hallway Floor in Cardiff Read More »

Terrazzo Church Floor Restoration Cardiff

Chancel Terrazzo Floor Restoration at a Cardiff City Church

During last summer I was asked to restore a Terrazzo floor in the chancel of a Catholic Church in the centre of Cardiff city centre. Our client was actually the architect in charge of the restoration, and he wanted to see if the Terrazzo floor that was laid around 1900 could be restored.

Terrazzo Church Floor During Restoration Vale of Glamorgan

The architect was coordinating different trades with a plan to restore the church interior back to its near original state and I’m proud to say that Tile Doctor was the architect’s choice of contractor to carry out the work. We talked though what needed to be done, how we would gain access, and agreed a plan of work, as well as the price for the job.

Deep Cleaning a Terrazzo Tiled Chancel Floor

The altar at the back of the church had been taken away for renovation which was just as well as the carpet ran underneath. With this section of the church to ourselves the first job was to remove the black rubber carpet underlay glued to the surface of the Terrazzo. To remove the bulk, it had to be scraped off using sharp blades and a great deal of effort. This was a messy process that could only be completed manually.

Terrazzo Church Floor During Restoration Vale of Glamorgan

Once the underlying Terrazzo floor was visible, I was able to work out what products and processes would be the best option for the restoration. With the bulk of the rubber out of the way I decided to try burnishing the floor with Tile Doctor Diamond Floor Pads starting with a very abrasive grade lubricated with water.

To keep the mess to a minimum the waste was vacuumed up as we went, and this made it possible to crack on across the whole area. At this first stage we also burnished around the perimeter and awkward to reach areas with a handheld polisher to ensure nothing was missed and to blend the areas.

One finished with the coarse pad the floor was given a full rinse with water and the remaining soil removed with the wet vacuum. Once done finer grit burnishing pads were applied using the same process to bring up the polish on the Terrazzo. After the wet work was completed, the floor was left to dry out for a minimum of 24 hours.

Sealing a Terrazzo Tiled Church Floor

On our return a few days later, the fourth and final polishing pad was used to create a shine and smooth the surface. The church council had requested a deep shine appearance to the Terrazzo so to finish the floor in two stages starting with the application of a sealer. For this floor I chose to apply two coats of Tile Doctor Colour Grow, a colour enhancing impregnating sealer which provides hard wearing surface protection whilst improving the colour contrast.

The final stage was to grind Tile Doctor High Shine Powder into the floor completing two sqm at a time and rinsing with clean water as we worked. This is a crystallising powder that provides a very high shine and provides a tough durable finish that works well on many floor types and was perfect for this terrazzo floor.

Terrazzo Church Floor After Restoration Vale of Glamorgan

Once the final polishing had been completed, we buffed the floor with a soft White Buffing Pad. The church members and architect were delighted with the finished result and contacted Tile Doctor to relay their thanks. This was a lovely project to complete, it is always nice to work within the community as well as for retail clients.

Terrazzo Church Floor After Restoration Vale of Glamorgan


Professional Restoration of a Terrazzo Church Floor in South Wales

Chancel Terrazzo Floor Restoration at a Cardiff City Church Read More »

Verde Limestone Kitchen Floor Renovated Cardiff

Vomit Damaged Verde Limestone Floor Renovated Following Drunken Party in Cardiff

The young gentleman who owned this property in Cardiff was distressed about his new Verde Limestone kitchen floor. He explained to me that he recently had a party at the house and one of his friends drunk too much and vomited over the stone floor. Easy enough to clean up you would think, however in a rush to clean up the mess he slipped banged his head on the corner of the worktop and ending up bleeding onto the sick.

Vomit Stained Limestone Kitchen Floor Before Renovation Cardiff

Thankfully his friend was ok. but unfortunately, the acid from the stomach, had caused the surface of the Limestone to be etched quite considerably and now appeared to show permanent wipe marks across some of the floor. Thankfully I advised that we could repolish the surface of the stone to rectify the problem, and this would soon have his floor looking good as new again. The 12mm Verde Limestone tiles have a lovely green shade and set the newly fitted kitchen off a treat. We agreed a price for the work, and I booked the job in soon after.

Cleaning a Limestone Tiled Kitchen Floor

To restore the appearance of the floor it needed to be burnished with a set of Tile Doctor Diamond encrusted pads which resurface the tile and rebuild the polish. I started with an abrasive 400-grit pad fitted to a weighted rotary machine worked into the Limestone using only water to lubricate the process. The floor is then rinsed with water to remove the soil which is then extracted with a wet vacuum. This process is repeated using an 800 , 1500 and finally a 3000-grit until the surface of the floor was restored with a high polish.

Vomit Stained Limestone Kitchen Floor During Renovation Cardiff

The grout was then cleaned with Tile Doctor Pro-Clean which is a versatile cleaning solution ideal for grout cleaning. It’s diluted with water and then left to soak into the grout line for a short while before being scrubbed in. After scrubbing the waste is rinsed off with water and extracted with the wet vacuum.

The floor was left to dry overnight with assistance from a floor flan so it would be nice and dry for sealing the following day. By the end of the first day the stain was gone, and the Limestone looked so much better, much to the relief of my client.

Sealing a Limestone Tiled Kitchen Floor

The next morning, I took a few moisture readings from the tile to make sure it was dry and ready for sealing. The readings were fine, so I set about applying Tile Doctor Stone Oil to the stone. This product soaks into the pores of the stone restoring the natural oils to the stone and enhance the strong dark green colour of the Verde Limestone.

Vomit Stained Verde Limestone Kitchen Floor During Sealing Cardiff

The Limestone needed to be dry before continuing with the last stage of sealing so stone oil was left to dry off overnight and I came back the next day to finish off. People may get the impression from reading this that I am a little over cautious, but I’ve learned from experience that applying a sealer to a damp floor is not a good idea.

So the next day I returned to seal the tiles and for this floor I used three coats of Tile Doctor Colour Grow which is impregnating sealer that protects from within whilst enhancing the natural colours in the stone. The combination of the Stone Oil and Colour Grow add long lasting protection to the stone whilst improving its appearance.

Vomit Stained Verde Limestone Kitchen Floor After Renovation Cardiff

The gentleman in question was over the moon with the result as he left the following glowing feedback for me; I understand he is not planning any more parties any time soon!

We are absolutely delighted with Julian’s work! Our limestone kitchen floor was very damaged and we were worried that the damage would be irreparable – Julian diamond polished and resealed the floor and it looks like new. He was an absolute pleasure and the quality of the work was amazing. I will definitely be getting in touch to help preserve the floor in the future. Thank you!

Vomit Stained Verde Limestone Kitchen Floor After Renovation Cardiff


Professional Restoration of a Damaged Limestone Kitchen Floor in South East Wales

Vomit Damaged Verde Limestone Floor Renovated Following Drunken Party in Cardiff Read More »

Marble Tiled Floor Renovated Cardiff Wales

Marble Kitchen Floor Grout Cleaned and Polished in Cardiff

I took the pictures below during the renovation of a beautiful Marble floor that was installed in the kitchen and adjacent dinning area of a property in Cardiff. Busy family life had taken its toll on the floor and it had now lost most of its shine and the grout had darkened to an almost black colour due to ingrained dirt. Marble however is an amazing stone that responds well to polishing so I knew I could restore its appearance.

Covering Cardiff and the surrounding area I’m your local tile and stone restoration specialist covering the renovation of all types of Tile and Stone. My background is tiling, and I have been a member of the Tile Doctor restoration network for over ten years so if you need help do get in touch.

Deep Cleaning a Marble Tiled Kitchen Floor in Cardiff

First, I deep cleaned the grout lines using a strong dilution of Tile Doctor Pro-Clean, leaving it to soak into the grout for ten minutes before scrubbing it in by hand. I then rinsed off the solution with water and extracted the slurry with a wet vacuum to lift the deep staining.

Marble Kitchen Floor During Grout Cleaning Cardiff

With the grout now clean I turned my attention to the Marble tiles, I needed to remove any previous sealer and the ingrained marks. This was done using a 400-grit red burnishing pad applied to the rotary buffing machine. The pads are another Tile Doctor product and was the first in a series of four pads I would use to renovate this floor. After running the pad over each tile at least three times the floor was rinsed with water which was then extracted with the wet vacuum as before.

This was followed by an 800-grit pad to prepare and smooth the surface of the tile again rinsing and extracting afterwards. I then continued the process using a 1500-grit pad to smooth more and prepare the surface for the final pad. By using the pads in sequence, it is a gradual process and ensures the tiles have a consistent surface. The floor was then left to dry overnight.

Sealing a Marble Tiled Kitchen Floor in Cardiff

I returned the next day to apply the final pad which brings up the polish on the floor. It is a very fine 3000-grit pad which creates a nice shine and is applied dry using a small amount of water using a process we call a “Spray Burnish”.

Finally, the sealer was applied to the Marble, the sealer chosen was Tile Doctor Colour Grow which soaks into the pores of the stone and protects it from within. Colour Grow is a very durable sealer that enhances the natural colours in the stone without making the surface shiny. In this instance however the client requested the floor to have a high shine, so I went back for the 3rd day to ensure the initial sealer was cured and then applied a coating of Tile Doctor Shine Powder. This is a crystal type substance which is ground into the tiles using a white buffing pad to build up a deep and durable polish on the Marble.

Marble Kitchen Floor After Renovation Cardiff

This final step gave the floor a very high shine with a deep lustre and the client was delighted with result. For the regular maintenance cleaning of polished stone, I recommend using Tile Doctor stone soap which is specifically designed for maintaining this type of floor and will help maintain its lustre.


Professional Renovation of a Marble Tiled Kitchen Floor in South Wales

Marble Kitchen Floor Grout Cleaned and Polished in Cardiff Read More »

Victorian Terrazzo Kitchen Floor Before and After Restoration Penarth

Renovating an 1890’s Terrazzo Floor at a Church Vestry in Penarth

Detailed below is a fine example of what can be achieved restoring old Terrazzo flooring. The work took place earlier this year in the Kitchen of a Church Vestry in Penarth where the floor dated back to the Victorian 1890’s. Penarth is the wealthiest seaside resort in the Cardiff area and the second largest town in the Vale of Glamorgan, next only to the nearby Barry.

Terrazzo Tiled Floor During Cleaning Church Vestry Penarth

During the Victorian era Penarth was a popular holiday destination, known nationally as “The Garden by the Sea” and was often packed by visitors from the Midlands and the West Country. Along with the day trippers from the South Wales valleys, mostly arriving by train. Today, the town, with its traditional seafront, continues to be a regular summer holiday venue but with fewer visitors.

The client wanted a deep clean and shine finish, the floor had never been cleaned properly and as you can imagine it had a lot of footfall over the years and it really needed doing professionally. I visited to look first and carried out a small test clean to see how it would come up. Satisfied with this they were happy to accept my quote and we booked to return the following month.

Cleaning a Terrazzo Tiled Vestry Floor

With the aid of a rotary floor buffer I started the cleaning process with the application of a coarse 50-grit pad. The pad was run over the floor using a strong dilution of Tile Doctor Pro-Clean for lubrication. Pro-Clean is a concentrated, multi-purpose alkaline cleaner, which strips and degreases the floor. It is first left to dwell for 10 minutes or so and then agitated with the machine. Applied with the pad it cuts through old sealers, coatings, and of course ingrained dirt.

This process generates a lot of soil which is rinsed off with water and extracted with a wet vacuum. This was then followed by repeating the process with a 100 and then 200-grit pad. The area was given a thorough rinse with water and then dried as much as possible with the wet vacuum.

Terrazzo Tiled Floor During Cleaning Church Vestry Penarth Terrazzo Tiled Floor During Cleaning Church Vestry Penarth

Some repairs were then carried out at the edges of the Terrazzo floor which involved sympathetically filling with cement. Once this had hardened the floor was treated to a burnish using finer grits of Tile Doctor burnishing pads ranging from 400, 800 and 1500 grits rinsing and extracting with water after each one.

Terrazzo Tiled Floor During Cleaning Church Vestry Penarth Terrazzo Tiled Floor During Cleaning Church Vestry Penarth

After a final rinse, the floor was dried as much as possible with the wet vacuum and then left to dry off fully overnight, we would return the following day to carry out the sealing.

Sealing a Terrazzo Tiled Vestry Floor

The next day I was concerned the floor might not be dry enough after using so much water to clean it previously so before applying the sealer I checked the moisture levels with a damp meter. The readings were within tolerance however my next step was to give the Terrazzo a further polish with a 3000-git pad which is applied dry so would further dry the floor and bring up the surface appearance.

The last task was to seal the floor and for this we selected to use Tile Doctor Colour Grow, this is a colour intensifying impregnating sealer which soaks into the pores of the stone and provide durable stain protection. This product will cope well with the needs of a kitchen and is fully breathable which is important when choosing a sealer for old floors which do not have a damp proof membrane installed.

Two coats of colour grow were applied to the Terrazzo, allowing about thirty minutes drying time before applying the next. After the second coat had dried the floor was treated to an application of Tile Doctor Shine Powder which is buffed into the floor using the rotary machine to achieve a super durable and deep lustre to the floor.

Terrazzo Tiled Floor After Cleaning Church Vestry Penarth Terrazzo Tiled Floor After Cleaning Church Vestry Penarth

The Terrazzo responded very well to the treatment and the sealers applied will ensure it keeps its appearance for many years to come.


Professional Restoration of a Terrazzo Tiled Vestry Floor in South East Wales

Renovating an 1890’s Terrazzo Floor at a Church Vestry in Penarth Read More »

Marble Tiled Church Floor Before After Renovation Cardiff

Black and White Marble Church Floor Tiles Renovated in Ely Cardiff

I was contacted by “The Church of the Resurrection” in the Ely suburb of Cardiff to ask if we would improve the appearance of their Marble floor. We are always up for a challenge at Tile Doctor, so I arranged an appointment to visit the church, survey the floor and recommend a solution.

Marble Church Floor Before Renovation Ely

The church itself is relatively new and dates to 1934, the black and white Marble floor tiles were original however at some point in the past it had been covered in a carpet which had been glued down. The church committee now wanted to restore the Marble tiles back to its original beauty. I carried out a test sample which proved very successful and they were delighted with the results. I was very optimistic that this floor could be saved and would look pretty good at the end. We agreed a price and arranged the most convenient time to carry the work out when the church wasn’t in use.

Marble Church Floor Before Renovation Ely

Cleaning a Marble Tiled Church Floor

On my return I started the cleaning process by working in sections using a solution of Tile Doctor Remove & Go worked in with a black pad fitted to a rotary machine to breakdown the glue. Next, I worked thorough a range of burnishing pads, first changing the pad to a coarse 100-grit diamond pad which was run over the floor using the Remove and Go as a lubricant. The soil was then rinsed off the floor with more water and extracted using a wet vacuum. The pad was then changed to a 200-grit pad and the process repeated. The combination of the Remove and Go and the pads cut into the surface of the tile and remove the adhesive staining.

Marble Church Floor During Renovation Ely

Then I continued with a 400-grit diamond burnishing pad this time applied with a dilution of Tile Doctor Pro-Clean. After rinsing and extracting the soil I moved onto an 800-grit, 1500 grit and finally the 3000-grit pad to achieve a finish that they desired. These 17-inch diamond burnishing pads are available in set of four and really restore the deep polish of stone.

Marble Church Floor During Renovation Ely

Around the Altar there were two concrete areas which looked unsightly now that the floor was uncovered so I suggested that I carry on with the pattern of the floor using concrete paint. This proved very successful as it blended in well improving the general appearance of the area.

Marble Church Floor During Renovation Ely

Last step in the cleaning process was to improve the appearance of the Black Stone steps in front of the altar which were dull and marked from years of use. It was confined working space, so I polished these with a handheld machine fitted with 6-inch diamond burnishing pads. to restore the polished appearance of the stone.

Marble Church Floor During Renovation Ely

Sealing a Marble Tiled Church Floor

After cleaning and polishing the areas I proceeded to seal the Marble with Tile Doctor Ultra-Seal which is an impregnating sealer that soaks into the pores of the stone protecting it from within. Additionally, this sealer doesn’t change the colour of the stone, so it preserves its natural appearance. The black steps were sealed with Tile Doctor Stone Oil which really did enhance the jet-black lustre it was so in need of.

Marble Church Floor After Renovation Ely

The work was carried out in April 2019 and was completed over the coarse of a few days. The floor now looks stunning and gives the whole church a lift. Certainly, the project management team were delighted with the results as they had thought the floor was unsalvageable. They said they would highly recommend Tile Doctor again for future church projects, which is always very pleasing to hear.

Marble Church Floor After Renovation Ely Marble Church Floor After Renovation Ely


Professional Restoration of a Marble Tiled Church Floor in South East Wales

Black and White Marble Church Floor Tiles Renovated in Ely Cardiff Read More »

Victorian Tiled Pathway Before and After Rebuild Cardiff

Damaged Victorian Tiled Path Rebuilt in Cardiff

This Victorian tiled path leading up to a lovely period house in Cardiff was in a really bad state of repair with many damaged and cracked tiles. I had already been working on their hallway tiles and the customer was hoping I would be able to salvage the original tiles in the front path. I was confident something could be done but when I started to remove a few I soon found out that would be unlikely. I made a few calls and fortunately I was able to find replacement tiles in a local salvage yard that were a perfect match.

Victorian Tiled Pathway Before Rebuild Cardiff
The border tiles were a different matter though, so I had to buy new tiles that could be mixed with old for the border which I purchased from original style. I’ve used Original Style tiles on a few occasions in the past, they have a section dedicated to Victorian Tiles and stock quite a few of the popular patterns and decorative border designs.

Rebuilding a Victorian Tiled Path

The foundation of the path was cracked and crumbling so after carefully removing as many tiles that were worth saving I rebuilt the base with a new layer of cement.

Victorian Tiled Pathway During Rebuild Cardiff Victorian Tiled Pathway During Rebuild Cardiff

Once the new base was dry I was able to start Tiling as normal, I had taken photographs of the original pattern, so I was able progress quite quickly.

Victorian Tiled Pathway During Rebuild Cardiff Victorian Tiled Pathway During Rebuild Cardiff

Once the central pattern had been laid I progressed onto the edges which took longer to lay due to the complex pattern. Once all the tiles were laid and the adhesive had set I was able to move onto Grouting.

Victorian Tiled Pathway During Rebuild Cardiff

Cleaning a Victorian Tiled Path

Once the tiles were laid and grout had set I was able to move onto cleaning the whole path starting with an acid wash using Tile Doctor Grout Clean-up to remove any grout smears left over from the grouting and also to counter act any salts within the tile which could cause problems later.

After a rinse with water the path was then give a good scrub with Tile Doctor Pro-Clean which is a heavy-duty Tile and Grout cleaner that worked well to brings out ingrained dirt.

Sealing a Victorian Floor Sealing

The path was left to dry off overnight and I came back the next day to seal them, I left protection over the path each night after leaving and fortunately we experienced a rare spell of decent weather that week.

The sealer I chose was Tile Doctor Colour Grow, it’s fully breathable, which is important when sealing tiles exposed to damp conditions and it’s a colour enhancing sealer which brought out the best in the red quarry tiles as well as giving good protection to the tile surface.

Victorian Tiled Pathway After Rebuild Cardiff Victorian Tiled Pathway After Rebuild Cardiff

My customer was most impressed with the transformation and left the following glowing testimonial on the Tile Doctor feedback system.

“Julian was quick to respond to emails. He arrived on the date we arranged and was finished promptly. We had our hall tiles re-surfaced and the path completely relayed. Where possible outside Julian re-used the old tiles and when not then used new. The final finish is amazing and definitely gives a wow factor to the entrance to the property. Julian is trustworthy and I would highly recommend him and his work. Thanks for the hard work!
Nigel J, Cardiff 15 Jan 2018″

Victorian Tiled floor restored in South Wales

Damaged Victorian Tiled Path Rebuilt in Cardiff Read More »

Victorian Tiled Hallway in Cardiff Before and After Restoration

Original Victorian Tiled Hallway Thought Beyond Repair Rejuvenated in Cardiff

Many property owners who are lucky enough to have an original Victorian tiled floor in their homes face the same conundrum: can an old and potentially very damaged floor be salvaged and restored to peak condition or should I replace it?

Some people would instinctively tell you that the answer is no – even trained professionals! In fact, a leading tile restoration company (which shall remain unnamed) based in Cardiff told a recent customer of mine that her original Victorian tiled floor, dating back to 1905, was beyond repair. The company recommended that she not waste any money on having it restored and instead that she should have it ripped up and replaced.

Victorian Tiled Hallway in Cardiff Before Restoration
It was in a bad state, however replacing the floor would incur a significant cost and the original characteristics of the period floor would be lost. The customer was feeling rather deflated and was left undecided on what to do. Fortunately after browsing the web for a solution, she came across Tile Doctor and I was asked to pop over and take a look.

I visited the customer at her home and removed parts of her hallway carpet to get a better look at the Victorian tiles beneath. The floor was certainly in a very poor state, there were many old paint splash marks covering the tiles and the surface of the floor was deeply darkened after many years’ worth of wear and tear. In my opinion however, it was still salvageable, and the customer was happy to see what could be done.

Cleaning an Original Victorian Tiled Floor

A week before I was due to start the restoration, I asked the customer to remove the foam-backed carpet to let the floor breathe a bit.

Before beginning the work, I ran a few damp tests and the floor proved surprisingly dry considering how old it is and the very probable lack of a damp proof membrane. I started by manually scraping as much of the old paint staining off the stone as possible and cleared other debris from the surface.

Knowing that clay based Victorian tiles like these easily soak up paint splashes, I knew it would take a thorough clean to remove them completely. I firstly soaked the floor with water and left it to dry slightly before mixing a concoction of Tile Doctor NanoTech HBU, Tile Doctor Pro-Clean, and Tile Doctor Remove and Go.

NanoTech HBU is a particularly powerful cleaner which uses nano-sized particles to penetrate the pores of the stone, while Pro-Clean is an alkaline-based cleaner that tackles heavy soil build-up. Remove and Go is a multi-purpose product which both cleans and strips away any old sealer.

I left this mixture to dwell on the floor for around half an hour, scrubbed it in firstly using a black scrubbing pad fitted to a rotary machine and then a wire wool pad. I followed by rinsing the products off with water and extracted up the excess with a wet vacuum machine.

This technique was repeated until I was satisfied with the condition of the floor.

Sealing an Original Victorian Tiled Floor

After leaving the floor to dry off completely overnight, I returned to the property the next day to carry out the sealing process. I applied seven coats of Tile Doctor Seal and Go, which not only adds a protective covering to the tile, but also enhances its appearance.

The customer was absolutely thrilled with the results of the restoration, especially considering that she was told the floor was ruined by a leading company and not worth saving.

Victorian Tiled Hallway in Cardiff After Restoration
I think you will agree that its always worth trying to restore a period floor and my customer deserves praise for sticking to their guns.

Professional Period Victorian Hallway Floor Restoration in South Wales

Original Victorian Tiled Hallway Thought Beyond Repair Rejuvenated in Cardiff Read More »

Bathstone Window Cills Before and After Cleaning Cardiff

Dirty Bath Stone Cill’s Deep Cleaned in Cardiff

Bath Stone is a material that we don’t often encounter. A variation of Limestone, its distinctive yellowish or ‘honey’ colouring is best associated with historical buildings in the City of Bath – hence the name ‘Bath Stone’. However, it has commonly been used as a building material throughout southern England and Wales.

The owner of this property in Cardiff was quite upset that her Bath Stone window sills had become so unsightly over the four-year period since her house was built, so much so that she contacted Tile Doctor to see if we could help.

Bathstone window cill before cleaning Cardiff Bathstone pillar before cleaning Cardiff

Cleaning Dirty Bath Stone Window Sills

While at Tile Doctor we most often work on tiled floors, patios and shower cubicles, I was more than happy to assist in this situation. I popped round to the property to carry out some initial cleaning tests on an inconspicuous area of one of the window sills.

I applied Tile Doctor Pro Clean, which is our high alkaline cleaner, since it’s a very versatile and reliable product, and is suitable for use on most kinds of natural stone. Some fantastic results were achieved quickly, with Pro Clean working efficiently to remove the green and black algae that I presumed came from the trees which were plentiful around the property.

Bathstone window cill after test clean Cardiff
With the test clean a success, we agreed a date to complete the job. I returned on the agreed date with a ladder to treat the rest of the sills using Pro Clean, including the one on the first floor window.

Bathstone window cills after cleaning Cardiff
Before carrying out the work, I tested the stone for moisture and the readings were sky high. Therefore, I suggested to the customer not to seal the stone, but instead to maintain it using the same cleaning process as I had undertaken.

Bathstone window cill after cleaning Cardiff
The outcome of my restoration was brilliant, so now when the customer feels that the sills need to be rejuvenated again, she can do so very easily.

Professional Cleaning of Stained Bath Stone Window Sills in South Wales

Dirty Bath Stone Cill’s Deep Cleaned in Cardiff Read More »

Quarry Tiles After Restoration in Splott Cardiff

Badly Stained Quarry Tiles Deep Cleaned and Sealed in Splott

These Quarry tiles at a house in Splott, a small town not too far from the city of Cardiff, had certainly endured a hammering after what appeared to be recent decoration in the room. The tiles were heavily soiled, with sand and cement mixed up and splattered across the floor, along with deep paint and plaster stains.

Quarry Tiles Before Restoration in Splott Cardiff

The customer had already scraped off as much of the cement and other stubborn stains off – as much as they could, at least. Quarry may be typically hard wearing, but this doesn’t necessarily mean it’s any easier to clean when it gets into a bad way. Eager to find a solution to the problem, the customer found Tile Doctor via the Internet, and not long after we arranged for me to come down to the property to see what could be done.

Quarry Tiles Before Restoration in Splott Cardiff Quarry Tiles Before Restoration in Splott Cardiff
Quarry Tiles Before Restoration in Splott Cardiff

Upon arriving at the property and giving the tiles an initial inspection, I explained that not all stains and marks will come off or out of the tiles, as some staining is simply permanent. Nonetheless, the customer indicated they would be satisfied with any improvement made to the condition of the floor. Having restored tiles similar to these before, I knew that the results could still come off very well using the right methods and products.

Cleaning a Stained Quarry Tiled Floor

To begin I mixed a strong solution of Tile Doctor NanoTech HBU and Pro Clean, a combination of two different cleaners. Pro Clean is a versatile, high alkaline cleaner that is used to deal with reasonably heavy soil build-up on natural stone floors. It also contains stripping properties that allow it to start breaking down any old sealers when left to dwell on the tiles. NanoTech HBU takes the cleaning process a step further: it is specially formulated to use nano-sized cleaning particles to reach dirt and stains deeply ingrained in the stone, before dissolving and lifting them out.

This solution was applied to the floor and, working in small sections, I scrubbed it into the tiles using a rotating scrubbing machine fitted with a nylon brush attachment. The floor was then rinsed, and the resulting cleaning slurry was vacuumed away using a wet-vax machine.

My next concern was the grout, which was afflicted by stubborn cement marks. I opted to remove these firstly by carefully applying Tile Doctor Grout Clean Up, an acid-based cleaner. Some cement marks remained despite the application, and so I attempted to manually scrape and chisel them away. While I had some good success, as mentioned not all cement stains can be removed, especially if they have been there for a long time. Some old cement mixture is as hard as flint!

Sealing a Quarry Tiled Floor

I left the floor to dry following the clean and came back two days later to seal the tiles, checking first that they were dry by taking multiple readings with the damp meter, and comparing them with earlier results.

The test results came back fine, so I started with the lengthy task of applying eight coats of Tile Doctor Seal and Go sealer. Having sealed similar floors with Seal and Go before I knew the results would be very desirable, with the deep natural colours in the stone being enhanced by the product. Seal and Go is my preferred sealer for Quarry tiles as it helps disguise some permanent marks and adds a durable satin shine finish.

Quarry Tiles After Restoration in Splott Cardiff

While unfortunately a stained floor like this will never be able to look good as new, the results I managed to achieve were very pleasing. Certainly there was no evidence left of recent decoration, with the vast majority of the stains and marks no longer damaging the appearance of the tiles. The fresh seal has really brought out the red and black checked pattern in the floor. Needless to say the customer’s expectations were exceeded!

Quarry Tiles After Restoration in Splott Cardiff Quarry Tiles After Restoration in Splott Cardiff
Quarry Tiles After Restoration in Splott Cardiff

Professional Tile Cleaning and Sealing for a Badly Stained and Soiled Quarry Tiled Floor Restoration in South Wales

Badly Stained Quarry Tiles Deep Cleaned and Sealed in Splott Read More »

Limestone Reduxa After Stain Removal

Restoring A Stained Limestone Tiled Kitchen Floor in Cardiff

The following post is follows on from the Limestone tiled kitchen floor restoration I recently completed in Cardiff. You may recall that the floor had not been maintained properly since it was first installed in 2008 and one of the key problems I had to deal with during that particular restoration was a number of dark stains left on the tiles by the kitchen dustbin. Here’s a detailed account of how I tacked the staining.

Limestone Reduxa Before Stain Removal

Cleaning a stained Limestone tiled floor

To deal with the stains, I suggested to the client that I experiment with a Tile Doctor product called Reduxa, which is formulated to remove certain stains, including red wine stains, from natural stone. It is suitable on Limestone, Marble and Travertine tiles, amongst others. Nonetheless, I did have to advise the client that unfortunately some stains are unavoidably permanent and that there was no guarantee that the product would be able to remove these particular stains. Had the sealer been maintained on this floor, then the problem would have been much easier to tackle. However, in this case the sealer had worn off over the years.

I began treating the problem area by applying the Reduxa solution, before heating up the tile with a heat gun to lift out the stains. This process of spraying and heating was repeated around eight times.

Limestone Reduxa After Stain Removal
To cut a long story short, the process worked very well, and both myself and the client were amazed at the results the Reduxa stain removal solution had on the floor. This product really does what it says on the label!

Limestone Reduxa After Stain Removal
If you would like more information on the product, check out the video on the Reduxa page on the Tile Doctor website.

Professional tile cleaning restoration for badly stained Limestone tiled kitchen floor in Cardiff

Restoring A Stained Limestone Tiled Kitchen Floor in Cardiff Read More »

Unmaintained Limestone Kitchen Floor After Cleaning Cardiff

Unmaintained French Limestone Tiled Kitchen Floor Restored in Cardiff

This customer from the historic city of Cardiff was keen to see what Tile Doctor could do to put some life back into their treasured Limestone kitchen floor that was laid in 2008. My first observations were mainly centred on the horrific condition of the surface which although adequately sealed initially the floor had not received any subsequent maintenance and its condition had deteriorated over time. The light shining in from the patio doors highlighted all the imperfections in the floor caused by surface wear and tear commonly seen in high traffic areas such as a kitchen.

Unmaintained Limestone Kitchen Floor Before Cleaning Cardiff Unmaintained Limestone Kitchen Floor Before Cleaning Cardiff

Upon closer inspection, there were further problems: the floor was stained and scuffed, and in most places the sealer had worn off completely allowing the dirt to become ingrained into the pores of the Limestone. Additionally the grout was recessed but was now flush with the tile surface due to dirt build-up. There were also areas contaminated with grease and kitchen cooking oil.

The Limestone floor tiles were 20mm thick French Limestone, and had been laid very well so there was no requirement to do any tile or grout repairs however to get this floor back to its original condition the surface would need to be reconditioned using the Tile Doctor four stage burnishing system.

Restoring a French Limestone Floor

I started by giving the floor a wash with a medium dilution of Tile Doctor Pro-Clean, focusing mainly on the grout lines in order to remove the muck that had built-up there. I used a special stiff grout brush for this activity; it’s quite narrow and ideal for grout scrubbing.

This worked well, but the significant build-up of dirt along some of the grout lines meant more work was required. I tackled this problem with a hand scraper assisted with steam. At the end of this process, the whole floor was then rinsed down with water to remove any soil and the resulting slurry was then extracted using a wet vacuum.

Unmaintained Limestone Kitchen Floor During Grout Steam Cleaning Cardiff Unmaintained Limestone Kitchen Floor During Grout Steam Cleaning Cardiff

Burnishing French Limestone Tiles

The next step was to start the burnishing process, which basically involves applying four diamond encrusted floor pads in sequence over the floor. Each pad is a different grade, starting with the most abrasive coarse pad and moving through to the finer grades using a little water to lubricate and rinsing away any slurry between each pad.

Unmaintained Limestone Kitchen Floor During Cleaning Cardiff Unmaintained Limestone Kitchen Floor During Cleaning Cardiff

I eventually finished with the extra fine pad which builds up shine and lustre on the tile; it had taken two days to clean the grout and burnish the Limestone but the floor was much improved and so after a final rinse down I left the floor to dry off overnight with the aid of the underfloor heating.

During this time, I also addressed the stained Limestone in the area of the kitchen where the dustbin was situated. This had been a major upset for the customer and I’m happy to report I managed to deal with it. However, it was quite an involved process, so I’ll write about this in a separate post.

Sealing a Limestone tiled kitchen floor

On the third day I came back to seal the floor, checking first that it had dried sufficiently with a damp meter. Fortunately, the underfloor heating had done a great job of drying the stone and I was able to seal the floor using three coats of Tile Doctor Colour Grow sealant. This sealant not only provides a durable seal but also penetrates deep into the pores of the stone protecting it from within and enhancing the natural colours of the Limestone in the process.

After the final layer of sealant, I worked over the floor again with the extra fine burnishing pad both to add shine again following sealing, and to ensure that no smear marks were visible as the lighting conditions were unforgiving and highlighted any imperfections.

Unmaintained Limestone Kitchen Floor After Cleaning Cardiff Unmaintained Limestone Kitchen Floor After Cleaning Cardiff

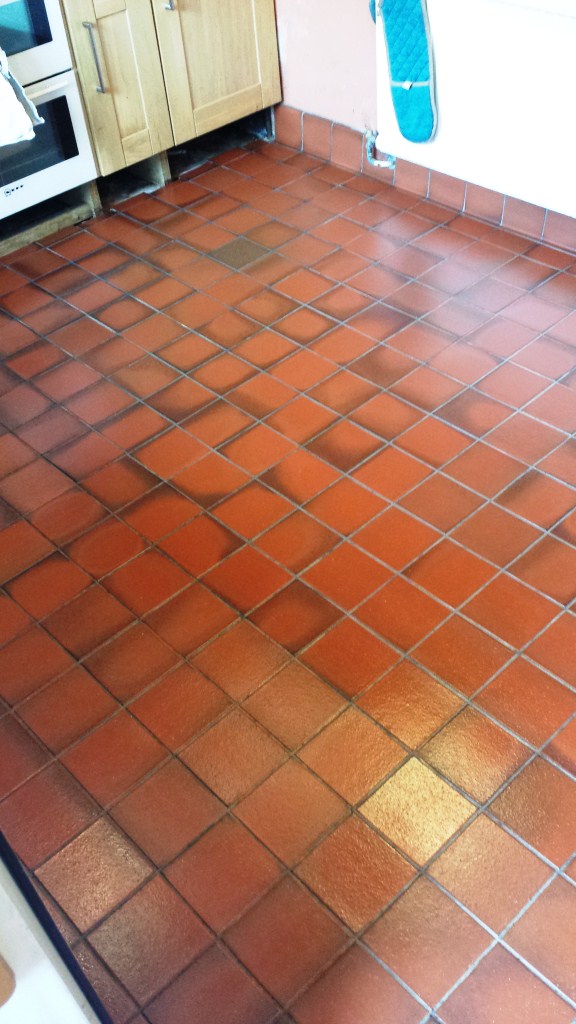
The customer was delighted with the results: so much so, in fact, that they booked me in to restore their Victorian hallway floor as well but that’s a story for another time!

Restoring French Limestone Kitchen Floor in South Wales

Unmaintained French Limestone Tiled Kitchen Floor Restored in Cardiff Read More »

Shower Tile Refresh Cardiff

Tile Installation Problems Resolved in a Cardiff Bathroom

Sometimes my clients ask the question: “Why is the grout coming out of the joints in my bathroom floor, and what can I do about it?” This job at a house in the city of Cardiff had exactly that problem and I had been asked to resolve it, additionally one of the tiles had become cracked and need replacing.

Cracked Bathroom Floor Tile Repair Cardiff Cracked Bathroom Floor Tile Repair Cardiff

The cause was due to movement in the floor when walked on, causing the grout to dislodge from the tile; this is not uncommon on tiled floors where there is wooden base and there is a lack of flexibility in the adhesive, most likely because it was watered down upon initial installation or a flexible product was not used. In this case the floorboards outside the bathroom door would squeak when stepped on, suggesting that there was some degree of movement under the bathroom floor, making the substrate move very slightly – but enough to cause problems. All I could really do in this situation was to remove the existing grout with a small machine and re-grout the entire area using a highly flexible grout.

Cracked Bathroom Floor Tile Repair Cardiff Cracked Bathroom Floor Tile Repair Cardiff

These thoughts were confirmed when I came to replace one cracked tile in the centre of the floor. Upon removing the broken tile I saw that the tiles had been laid on 13mm of adhesive which was very brittle and soft, allowing it to be scraped off the tile and the floor easily. Only approximately 50% of the tile was covered in adhesive, suggesting that it had been laid rather carelessly. Tiles must have 100% adhesive coverage, especially in bathrooms with underfloor heating, because the heat and cold can directly impact the stone and cause cracks.

Cracked Bathroom Floor Tile Repair Cardiff Cracked Bathroom Floor Tile Repair Cardiff

Fortunately the customer had a spare tile and so I carefully chopped out the broken tile and removed the surrounding grout and adhesive causing no disruption to the surrounding area. The replacement tile was secured in place with adhesive and then grouted using a matching grout, this time using flexible products.

Cracked Bathroom Floor Tile Repair Cardiff Cracked Bathroom Floor Tile Repair Cardiff

The next job was to take a look at the shower cubicle where I was disappointed to see that the contractor who was responsible for the initial installation of the floor had used a very cheap silicone between the base and the shower wall. It was now mouldy and had de-bonded in places that it had to be cut out and replaced by a stronger, high quality silicone. Generally speaking, silicone should last more than 2-3 years (this floor had been installed in 2012).

Shower Tile Refresh Cardiff
I cut the old silicone out with a sharp knife, cleaned up the edges and replaced the silicone with a quality product.

Shower Tile Refresh Cardiff
The ceramic and mosaic tiles were in good condition so this really was just a case of resolving some installation problems however for general cleaning I would recommend Tile Doctor Stone Soap which is a new Biodegradable organic product ideal for cleaning bathroom tiles.


Bathroom Installation Problems Resolved in South Wales

Tile Installation Problems Resolved in a Cardiff Bathroom Read More »

Black and white chequer Victorian Tiles Cardiff After

Victorian Chequer Tiled Hallway Floor Deep Cleaned in Cardiff

Sometimes you survey a job and you know that if you get the chance to restore it the results will be totally fantastic! This was the case with this Victorian black & white chequer tiled floor in the hallway of a large terraced Victorian house in Cardiff which dated back to around 1900 and was now looking well past its best, I know this because my family used to live in the house opposite. It was a well laid floor with no readings of dampness; I believe it’s imperative you check a floor for dampness before starting so you know what the baseline damp level is and which sealers will work with the floor.

Black and white chequer Victorian Tiles Cardiff Before Black and white chequer Victorian Tiles Cardiff Before

Deep Cleaning a Victorian Tiled Floor

My first action was to hoover the floor and then scrape as much debris off the surface as possible, and then as always I mixed 50/50 Tile Doctor HBU (Heavy Build-Up) remover with Pro-Clean and on this occasion because I wanted the white tiles to become really white I added the same amount of Tile Doctor Grout Clean-Up. This special recipe created a very formidable and strong cleaning solution which is what the job called for. I swept it over the whole floor letting it soak in for about ten minutes and then worked it into the floor using a scrubbing machine fitted with a coarse black pad adding more of the solution to the floor where it was drying out as I went.

Black and white chequer Victorian Tiles Cardiff During Cleaning Black and white chequer Victorian Tiles Cardiff During Cleaning

The next step was to rinse the floor twice with water and extract the now filthy cleaning solution using a wet vacuum. At this point I inspected the tiles and I could see there were still a few stubborn areas with spots of paint and glue which I addressed with a decorators steam plate together with a scraper and hand held scrubbing pad.

I was now happy that the floor was clean and ready to be sealed, before sealing though it’s important to remove any trace of cleaning solution as it may contaminate the sealer so I gave the floor a thorough rinse and extracted as much of the water as possible to reduce drying times.

Sealing a Victorian Floor Sealing

I left the floor to dry for 48hrs before coming back to seal the tiles taking a reader on my damp meter first to establish they had indeed dried out. To seal the floor I used eight coats of Tile Doctor Seal & Go which really works well on Victorian tiles and in this case made the whites really stand out.

Black and white chequer Victorian Tiles Cardiff After
The customer wanted this floor to look good because they were selling the property and were due to have an open day. The clean tiles really gave the house the wow factor and period features are so desirable these days so I don’t think it will take long to sell.

Black and white chequer Victorian Tiles Cardiff After
 

Victorian Tiled floor restored in South Wales

Victorian Chequer Tiled Hallway Floor Deep Cleaned in Cardiff Read More »

Sandstone Floor Cardiff After Cleaning and Sealing

Sandstone Tiled Floor Deep Cleaned in Cardiff

This Sandstone tiled floor with Limestone coloured grout in Cardiff was laid in 2006 and had now discoloured with wear and tear and had almost turned black in places which I suspect was due to no sealer being applied after installation.

I carried out a cleaning sample using Tile Doctor HBU Remover, which is a strong cleaning solution, applied it to one tile in the utility room and the dirt lifted off with remarkable results; I then dried the tile with a heat gun to show the customer the results which she was happy with.

Sandstone Floor Cardiff Before Cleaning Sandstone Floor Cardiff Before Cleaning

Cleaning a Sandstone Tiled Floor

For the rest of the floor I started by wetting the surface and carried on treating it with more HBU remover diluted 50% with Tile Doctor Pro-Clean which made it thinner and more effective for deep cleaning. Using a stiff sweeping brush with bristles about half inch long (well broken in for this type of job) I then scrubbed away at the tiles and then the grout joints using a small hand held scrubbing brush which I always find is more effective than a machine which can make a lot of mess and can be overly aggressive. I cleaned the tiles in 5m2 sections rinsing each section four times to ensure there were no trace of cleaning solutions left behind. When finished the floor was left to dry for two to four hours and I tested for moisture knowing it would be ok but always worth checking.

Sealing a Sandstone Floor Sealing

I sealed the Sandstone with four coats of Tile Doctor Colour Grow which is an impregnating and colour enhancing product which will protect the floor for many years to come.

Sandstone Floor Cardiff After Cleaning and Sealing
I tested the floor with a water test to ensure it was fully sealed, this is a simple test whereby you check to see if drops of water applied to the surface form beads on the tile. The end result was incredible as you can see the tiles looked as good if not better than the day they were cut from the quarry, and the Colour Grow certainly enhanced the true colours in the stone.

Sandstone Floor Cardiff After Cleaning and Sealing Sandstone Floor Cardiff After Cleaning and Sealing


Sandstone Tiled floor cleaned and Sealed in South Wales

Sandstone Tiled Floor Deep Cleaned in Cardiff Read More »

Full Victorian Floor Restoration Cardiff Finished

Full Restoration of a Victorian Tiled Hallway Floor in Cardiff

Never give up is how I would describe this job!!! I initially surveyed the floor in this Cardiff kitchen in November 2014 and finally completed it and the end of February 2015 working on it off and on as I searched for right tiles to match the existing.

On my survey the Victorian tiled floor which the customer was hoping to restore was covered over by ceramic tiles which the customer agreed to remove before my next visit so I could carry out a cleaning sample. Additionally there was an area of flooring which needed to blend in with kitchen as the pantry wall that previously separated it had been knocked down.

The ceramic tiles were removed and I came round to carry out a cleaning sample in what I thought was one of the more heavily soiled areas; I used Tile Doctor Remove & Go combined with another Tile Doctor product called NanoTech HBU which stands for Heavy Build-up Remover. The results were successful and it was decided to go ahead with the restoration.

Full Victorian Floor Restoration Cardiff Exposing the tiles Full Victorian Floor Restoration Cardiff Exposing the tiles

During my visit I tested for moisture and in general the readings were good with the highest reading of 12 in different parts of the floor.

Fully Restoring a Victorian Tiled Floor

To restore the tiles I set about cleaning adhesive and grime off using a combination of Tile Doctor Nanotech HBU and Pro Clean which was left to dwell and soak in for two hours before scrubbing with a rotary machine fitted with a black scrubbing pad. I tried this for a while and found it was not removing the dirt as expected and on inspection I discovered that the inner body of the ceramic tile was still stuck to the floor. It seems the when the customer removed the ceramic tiles they had only managed to remove the top layer of the tile and had left the lower part stuck to the floor. This Job was now becoming a nightmare as the solution would be to chip and scrape away tiny pieces of the remaining tile away so I could reach and clean the original Victorian floor.

Full Victorian Floor Restoration Cardiff Scraping Off Adhesive Full Victorian Floor Restoration Cardiff Scraping Off Adhesive

I had suggested to the customer that it might be cheaper to replace the whole floor but he was adamant that we should continue with our original plan and try to do the best job possible so never giving up I was happy to oblige.

In between cleaning the floor I prepared the base adjacent to the original floor with levelling compound. Also with the cleaning in progress I was getting a better look at the Victorian tiles which were now starting to appear and I could see how badly damaged which would have to be replaced.

Full Victorian Floor Restoration Cardiff Levelling Compound Full Victorian Floor Restoration Cardiff laying replacement tiles

The hallway floor had to be cut at the kitchen doorway as it protruded into the kitchen which when the door was closed looked odd so the customer was happy with my suggestion. I made different suggestions for the new floor layout, and colours which we felt complimented each floor pattern , the new tiles were purchased from original style and the local reclamation yard but I did have to cut the back off a few because of different thickness.

Full Victorian Floor Restoration Cardiff Trimming reclaimed tiles Full Victorian Floor Restoration Cardiff Laying new tiles

I finished fixing the replacement tiles and laying the new tiles in a pattern that we had agreed and in a style that best matched the original floor.

Full Victorian Floor Restoration Ready for sealing

Sealing a Victorian Floor Sealing

After all the work undertaken including the tilling of the area attached to the original I gave the whole floor a final and thorough steam clean which I did on a the Friday leaving it to thoroughly dry out over the weekend so I could move onto sealing early the following week.

Unfortunately when I arrived on Monday I discovered patches of efflorescence had appeared on certain tiles and I was still unable to finish the job. To resolve this the tiles needed to be given an wash down with Tile Doctor Grout Clean-up diluted 50/50 with water; this did the trick so I gave the floor another rinse with water and left to dry overnight.

When I returned the next day I checked for moisture which was a borderline reading of 15-16 so using a heat gun applied some warmth to the whole floor making sure to let it cool down before sealing with a coat of Tile Doctor Colour Grow which is an impregnating sealer that occupies the pores in the tile to prevent dirt from becoming ingrained there. Next I applied three coats of Tile Doctor Seal and Go which added a nice sheen to the floor and really brought out the vibrant reds in the tile. The following day I returned to do some tiling on wall above the cooker so applied a further three coats of Seal and Go to the floor to ensure it was fully sealed.

Full Victorian Floor Restoration Cardiff Finished Full Victorian Floor Restoration Cardiff Finished

If you have read this story through to the end you will appreciate that this was a mammoth job however it was satisfying to do and the final result looks fantastic, needless to say both myself and the customer were very happy with the end result.

Victorian Tiled floor hidden under ceramic tiles fully restored in South Wales

Full Restoration of a Victorian Tiled Hallway Floor in Cardiff Read More »

Victorian Floor After Cleaning in Cardiff

Victorian Tiled Hallway Floor Cleaned in Cardiff

This owner of this house built around 1900 in Cardiff had asked me if I could make their look any better following their attempt at renovating their original Victorian Tiled floor. I examined the floor and established that they had sealed the floor without testing for moisture also it seemed it had been sealed but not correctly cleaned and more importantly not rinsed thoroughly to eradicate any cleaning solutions first; the results as you can see has caused a terrible patchy mess .

Victorian Floor Before Cleaning in Cardiff Victorian Floor Before Cleaning in Cardiff

Cleaning a Victorian Tiled Floor

The floor was tested for moisture first which established it was dry and also established a baseline as to what to look for later. The next step was to remove any sealers present which proved very difficult because the sealer had only been applied 6 months earlier and applied thickly with a roller. I used three litres of Tile Doctor Remove and Go in total to strip 6 m2 applying it, letting it soak in and then scrubbing it in to get the sealer off. It took multiple rounds of scrubbing but once the sealer was removed I then went over the floor with Tile Doctor Grout Clean-Up to remove any grout smears and mineral deposits and then gave the floor a thorough rinse with plenty of clean water. To make sure I had given the floor a thorough clean the floor was then finished off more Remove and Go mixed with Tile Doctor NanoTech Ultra-Clean to make it more effective and then steam cleaned. The floor was then rinsed again with another two rinses with fresh cold clean water which was then removed with a wet vacuum I worked.

Victorian Floor After Cleaning in Cardiff Victorian Floor After Cleaning in Cardiff

Sealing a Victorian Floor Sealing

The floor was left to dry out and I came back on two occasions to check if it was dry enough to seal. The first time I visited was three days later and the floor had a high moisture level, I tested again after five days and the readings were ok to carry on with the sealing stage. The customer wanted a satin finish so I went ahead and sealed the floor with several coats of Tile Doctor Seal and Go with great results as you can see.

Victorian Floor After Cleaning in Cardiff
 

Victorian Tiled floor restored in South Wales

Victorian Tiled Hallway Floor Cleaned in Cardiff Read More »

Grubby Quarry Tiled Kitchen Floor Cardiff After Cleaning and Sealing

Kitchen Quarry Tiles Cleaned and Sealed in Cardiff

This Quarry Tiled Kitchen floor had been laid in 2000 which is relatively recent compared to some of the floors I’m asked to deal with, the tiles are 150 x 150 mm Quarry tiles with a mixture of colours. A customer in Cardiff said that the Quarry tiles has been sealed by the tiler however it wasn’t long after it was completed that the before became very grubby looking. You can see this for yourself in the photograph below where you should be able to make out the ingrained dirt and discoloured tile grout.

Grubby Quarry Tiled Kitchen Floor Cardiff Before Cleaning

Cleaning Quarry Tiles

I set about cleaning the floor with undiluted Tile Doctor Remove and Go mixed 3 to 1 with NanoTech UltraClean which adds tiny abrasive particles to a strong coatings remove; this mixture not only removes any previous sealers but also deep cleans the tiles and brings the grout back to its original colour. I used a rotary machine with a disc shaped scrubbing brush attachment disc which really gets into the dirt. The soiled solution was removed using a wet vacuum, stubborn areas retreated and then the floor was rinsed until all the cleaning solution had been removed.

Grubby Quarry Tiled Kitchen Floor Cardiff During Cleaning

Sealing a Quarry Floor Sealing

The floor was left to dry for 24 hours and I came back later to seal it. Before sealing I used a hand held damp meter to verify the floor had dried. I had previously discussed the choice of sealer with the customer to establish how they wanted the floor to look and selected Tile Doctor Seal and Go for its satin shine.

Grubby Quarry Tiled Kitchen Floor Cardiff During Sealing
I went on to seal the tiles with two coats of Tile Doctor Seal and Go using a water test to verify I had applied the right amount of sealer and that liquids were being repelled from the surface of the tile as opposed being absorbed.

Grubby Quarry Tiled Kitchen Floor Cardiff After Cleaning and Sealing
The floor cleaned up really well especially after sealing which brought the colours in the tile back to life; the customers were delighted with the results.

Quarry Tiled floor restored in South Wales

Kitchen Quarry Tiles Cleaned and Sealed in Cardiff Read More »

Quarry Tiles After Restoration in Cardiff

Quarry Tiled Hallway Floor Restored in Cardiff

This Red and Black Quarry tiled floor was discovered underneath a laminate floor in the hallway of a house built in Cardiff around 1910. The customer was keen to restore it as an original feature and I was confident that despite the damaged tiles, cement and paint we would be able to do so.

Quarry Tiles Before Restoration in Cardiff

Cleaning a Quarry Tiled Floor

The area around the doorway was in the worst condition and unfortunately those tiles were beyond rescue and needed to be replaced which wasn’t a problem as with a bit of research you can usually find what you need.

The next step was to carefully scrape as much cement and old paint off the tile surface as possible by hand and remove the waste; I also tested the floor at this point for dampness at the doorways as its good to know if there are any damp problems that may require additional attention. I then applied undiluted Tile Doctor Remove and Go to the whole floor with a brush agitating as I went, it was left it on for about an hour to break down any old sealers and coatings before being rinsed off with clean water twice which was then hovered up with a wet vacuum.

The next stage was to remove the cement using Tile Doctor Grout Clean-Up which being an acid based products starts to work as soon as it’s applied to the tile, this was worked in using a small hand held scrubbing brush before being given a good rinse down with clean water.

The last step of the cleaning process was to steam clean the tiles to open up the pores and ensure that no trace of cleaning agents was left behind that could upset the sealer.

Quarry Tiles After Restoration in Cardiff

Sealing a Quarry Floor Sealing

The floor was left to dry for two days before and I came back the next day to seal it. Before sealing however I wanted to be use it had dried out sufficiently so I tested it again use a Stanley hand held meter, the previous reading I took proved to be a useful benchmark. Sealing was done using two coats of Tile Doctor Seal and Go which really brought the floor back to life and lifted the lovely colours in the tile. Needless to say the customer was delighted with the restoration of the floor.

Quarry Tiled floor restored in South Wales

Quarry Tiled Hallway Floor Restored in Cardiff Read More »

Abused Victorian Floor Cardiff Completed

Abused Victorian Tiled Hallway Repaired and Refurbished in Cardiff

This is an original Victorian tiled hallway floor in Cardiff that dated back to when the house was built in the year of 1890. The previous householders of which had a radiator installed serviced by laying pipes right through the middle of the floor destroying the tiles as they went, they then back filled the channel with cement. On top of that many of the other tiles had been splashed with cement and paint.

Abused Victorian Floor Cardiff Before

Repairing Victorian Floor Tiles

My first job was to carefully remove the cement from the channel and to precisely cut back any old cement bedding and old cement grout away from any tile edges in preparation for the replacement tiles which fortunately I was able to get hold of.

Abused Victorian Floor Cardiff Before
After all the previous preparation I started carefully scraping off cement from all around the edges of the remaining tiles as well as gloss and emulsion splashes from the surface essentially giving the whole floor a thorough scrape with a hand held scraper vacuuming up the mess as I worked. Interestingly for a floor of its age I tested the floor in various places for moisture and found it to be perfectly dry.

Abused Victorian Floor Cardiff Before Abused Victorian Floor Cardiff Before

Cleaning a Victorian Floor

To clean the floor I mixed three parts Tile Doctor Remove and Go with NanoTech UltraClean which basically adds small abrasive particles to a powerful sealer and coatings remover making it even more effective. This was applied to the whole floor and left to soak in for an hour making sure not to let it dry out by applying further amounts; leaving it to dwell for an hour gives it time to eat away at any dirt and coatings on the tile making the scrubbing processes easier.

Abused Victorian Floor Cardiff Before
To scrub the tiles I used a rotary machine fitted with a black scrubbing pad rinsing and extracting the soiled solution along the way. This cleaned up the tiles well however there were still some cement stains so this time Tile Doctor Grout Clean-up was applied to the floor in sections and left to ten minutes to dwell before working it in with another black scrubbing pad and rinsing off. This product is acid based so you can’t leave on the tiles for too long; once I was happy with the final result the whole floor was given a thorough rinse with plenty of clean water using a wet vacuum to extract the waste and dry the floor.

The channel was then filled with cement and once it had set replacement replica Victorian tiles from The Original Tile Company were installed. I then grouted the floor in a medium grey grout let the tiles become solid and the grout go hard before using a steam cleaner to make sure that I have removed all the tile doctor cleaning solutions prior to sealing.

Abused Victorian Floor Cardiff Completed

Sealing a Victorian Floor Sealing

The customer wanted a semi-gloss finish so once I had tested the floor again to make sure it was dry I sealed the tiles with Tile Doctor Seal and Go which enhanced the colour of the floor tiles and added a nice sheen.

Abused Victorian Floor Cardiff Completed Abused Victorian Floor Cardiff Completed

As you can see the new tiles fitted beautifully and the old floor tiles cleaned up so successfully the difference is impossible to spot. It was a lot of painstaking work though taking five days to finish but well worth the result.

Victorian Tiled floor restored in South Wales

Abused Victorian Tiled Hallway Repaired and Refurbished in Cardiff Read More »

Scroll to Top